Any person who builds a private house, or replaces communications in an apartment, is faced with the choice of pipes for a gas pipeline. Many people are accustomed to the fact that gas supply systems are made of metal, but in recent years plastic gas pipes have become increasingly popular. There are certain GOSTs, according to which developers can make gas pipelines from plastic.
Gas pipes made of plastic
Is it possible to use polypropylene pipes for gas?
In Western countries, metal pipes are used only for the assembly of industrial pipelines. In the manufacture of water and gas supply systems, plastic elements are used. This is due to the performance characteristics of the material. Gas flows through a plastic pipe without any difficulty. Before putting the gas pipeline into operation, it is necessary to check the tightness of the connections of individual elements in order to prevent violation of the integrity of the system.
You can figure out which is better – a pipeline made of metal or plastic – by comparing these two materials. Differences:
- Weight - plastic pipes weigh less than metal parts. Thanks to this, they are easier to install; they do not require additional fastenings on vertical surfaces.
- Versatility - There are more factors to consider when choosing metal pipes than when using plastic parts.
- Price - tubes made from polymers are cheaper than metal ones.
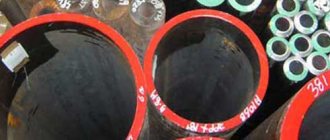
Metal tubes are superior to plastic ones in terms of strength, durability, and resistance to mechanical stress.
How to solve the problem with crimping
The finished line must be checked for leaks. Crimping is a mandatory step, as it allows you to identify possible defects in seams and joints. If a coolant leak in the heating system is fraught with problems associated with alteration, then a gas leak is life-threatening. Professionals involved in construction and installation work do not have problems with verification, but with independent installation it is more difficult.
Good afternoon, forum members!
Please share your experience on how you resolved the issue of pressure testing when installing a gas pipeline yourself.
Look for the most accurate pressure gauge, car compressor and go ahead. I don’t remember anymore, look at the joint venture, there are acceptable leaks there. But if everything is done correctly, the pressure will remain normal for a week. Of course, there are temperature errors, but overall it was fine. Only this method will not suit gas workers - you need a hydraulic pressure gauge. By order from above, the local gas company re-measured it, because the installed pressure gauge did not satisfy the accuracy class.
According to SP 62.13330.2011, crimping in parts and checking tightness with low pressures using a hydraulic pressure gauge are allowed. The accuracy class of pressure gauges is also indicated by standards. “Upon completion of the gas pipeline tests, the pressure is reduced to atmospheric pressure, automation, fittings, equipment, and instrumentation are installed and the gas pipeline is maintained for 10 minutes under operating pressure. The tightness of detachable connections is checked with soap emulsion.”
Despite the fact that GROs are very reluctant to “share their bread,” not only kam711, but also other portal participants independently install systems and achieve connection. Whether to follow their example or take the path of “least resistance” and order professional installation is a personal choice for everyone.
Characteristics
The technical characteristics of the material determine the scope of its application. When making a gas pipeline, you can use different types of plastic pipes. Each of them has its own technical characteristics.
Metal-plastic parameters:
- High chemical resistance.
- The material is not subject to oxidation.
- The maximum coolant temperature is up to 95 degrees.
- The maximum permissible pressure is up to 25 bar. If the temperature is high, the permissible pressure is reduced to 10 bar.
- The thickness of the metal layer between the plastic is up to 0.3 mm.
Characteristics of polyethylene:
- outer diameter of tubes - 10–110 mm;
- maximum coolant temperature - up to 95 degrees;
- at high temperatures the maximum pressure is up to 10 bar.
Polypropylene parameters:
- maximum coolant temperature - 90 degrees;
- permissible pressure at maximum temperature - up to 10 bar.
Polypropylene pipes can withstand short-term overheating up to 110 degrees.
Diameter of plastic pipes
GOI polishing paste Archimedes Norma
GOI polishing paste Archimedes Norma is a product for polishing metals, glass and plastic. It can also be used to prepare the surface for polishing. The paste allows both manual and mechanical use on any type of paint. The paste is designed to remove: oxidized surface layer; pigmented areas of paint; coating defects; scratches and marks; ingrained traces of insects.
Table 1. Abrasive GOST 3647-80
| Groups | Numbers | Groups | Numbers |
| grain | Grit size µm | grain | Designation |
| Grinding | Grinding powders | ||
| Glass, corundum, or a mixture of both | |||
| 63 — 50 | M63 | ||
| 50 — 40 | M50 | ||
| Micro grinding powders | |||
| 25-28 | M 28 | ||
| 18-20 | M 20 | ||
| 12-14 | M 14 | ||
| 10 | M 10 | ||
| 7 | M 7 | ||
| 5 | M 5 |
| Percentage composition. | Rough | Average | Thin |
| Chromium Oxide | 81 | 76 | 74 |
| silica gel | 2 | 2 | 1,8 |
| stearic acid | 10 | 10 | 10 |
| split fat | 5 | 10 | 10 |
| oleic acid | — | — | 2 |
| bicarbonate of soda | — | — | 0,21 |
| kerosene | 2 | 2 | 2 |
Rice. 3. Abrasive powders and paste GOI.
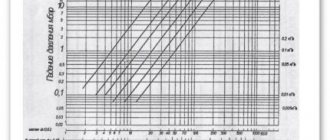
What is polishing ability
The standard test for polishing ability is carried out as follows: chaotic movements are carried out with a hardened steel or brass plate on a cast iron plate measuring 400 by 450 mm. in total, giving 40 meters of path at a certain pressure. The coarse paste removes approximately 40 microns of metal. medium, about 5 microns, thin 0.25 microns.
Lapping procedure
Plug taps are manufactured in 3 types: with a cast iron body and a brass plug, a brass body and a brass plug, and completely made of cast iron.
The grinding procedure is as follows:
- If the tap is twisted from a pipe, then the body is clamped in a yew with little force so as not to damage the body, with the larger diameter of the cone upward:
- Medium GOI paste is diluted with kerosene and applied evenly to the body of the plug with a brush;
- The knob is connected to a special threaded hole at the bottom of the cone;
- The plug is inserted into the body and rotated several times with light pressure;
- Why do 5-6 movements of the hand approximately 180°? If there are no serious grooves on the plug or body, then this is quite enough;
- Remove and inspect the cork; if black grooves of paste appear on it, you need to wipe the parts and try again until the blackness disappears;
- Then thoroughly wipe the plug and body dry. Apply several chalk longitudinal stripes to the cone, insert the plug and turn it, then inspect it; the chalk notches should be evenly distributed over the entire surface of the mating parts;
- After that, thoroughly wipe the mating surfaces again and, after applying sealing lubricant for gas taps, are assembled. You need to tighten the threaded holes with tow or fumig. tape is better with sealing lubricant. Sealing grease for gas taps can be purchased at a specialized plumbing store or ordered on numerous online resources.
It is finally checked for leaks with a soap solution; inflating a bubble is not allowed.
In order for the faucet to work correctly, it is necessary that the rotation of the plug in the faucet body occurs without effort, ensuring a reliable seal. For these purposes, special sealing and antifriction compounds are used. Sealing lubricants have a stronger concentration and are used to seal mating parts. Anti-friction lubricants are less viscous and are designed to separate moving parts. Lubricants must ensure reliable operation when heated to 300C. Solid substances such as graphite or fluoroplastic chips are added to the sealing composition. Anti-friction lubricants can be fatty or silicone based.
Stamps
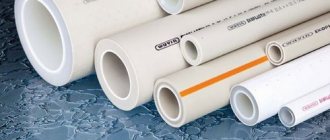
For the manufacture of pipelines, polypropylene or polyethylene is most often used. These types of polymers are labeled by manufacturers depending on the technical characteristics.
Polyethylene marking:
- PE-80 - indicated by a yellow stripe;
- PE-100 - marked with an orange stripe.
Polypropylene marking:
- PN10 - withstand pressure up to 10 atmospheres. Suitable for the manufacture of cold water supply pipelines due to the maximum permissible temperature of 45 degrees Celsius.
- PN16 - maximum permissible pressure 16 atmospheres. The operating temperature of the coolant should not exceed 60 degrees.
- PN20 - pipes with this marking can withstand pressure up to 20 atmospheres. They are suitable for assembling heating circuits, cold and hot water supply systems.
- PN25 - products made from this material can withstand pressure up to 25 atmospheres and temperatures up to 95 degrees. They are considered the best in the manufacture of pipelines for heating and central water supply.
Additionally, the SDR parameter is indicated on polyethylene pipes. It means the relationship between the thickness of the tube walls and the diameter. The lower this parameter, the greater the wall thickness. The thicker the walls of the parts, the greater the pressure they can withstand during operation.
Soldering
Equipment for soldering polyethylene pipes
It would be more correct to say butt soldering. Also used for polyethylene pipes. The condition for its implementation will be the mobility of the two articulated parts. Otherwise the process will be disrupted. In terms of efficiency, it is not inferior to the electrofusion one. To carry out the work you will need a modular unit. Its components are a hydraulic unit, a cutter, a soldering iron and a centralizer. To use it correctly, proceed as follows:
- Inserts for the size of the pipe being processed are mounted in a special vice.
- The pipes are clamped. Do not be zealous; if you tighten the bolts, the end will lose its circular shape, which will lead to problems.
- The areas to be soldered are cleaned of dirt and dust.
- Using a construction knife or other device, chips on the chamfer, if present, are eliminated.
- The valve on the hydraulic unit slowly opens before the components begin to move on the centralizer. The pressure value is marked as working.
- The parts are separated and a trimmer is inserted between them. It starts and shifts again. After several revolutions of the knives, the device can be picked up.
- To check the correctness and evenness of the joint, the pipes are moved again and carefully inspected.
- The joints are degreased with a solvent or alcohol wipe.
- The soldering iron is set to heat up.
- After reaching the set temperature, it is installed between the parts.
- The pressure for soldering is set according to the table and the centralizer modules are shifted again. They are held in tension until a sag of 1 mm is formed.
- After this, the pressure is released and they warm up for a few more seconds.
- The parts move apart and the heater is removed. Within 5 seconds, they must be docked again under voltage for another 5 seconds. After this, the force is removed and the cooling time is waited.
Before the end of the time period indicated for cooling, under no circumstances should you remove the vice or bend the pipes in any way. This may lead to depressurization.
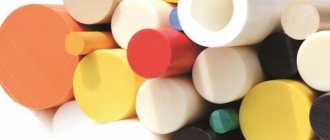
Kinds
Different types of plastic are used in production. Each of them has differences in technical characteristics and installation features:
- PVC. Parts made from this material are popular due to their low price, but this type of polymer has one significant drawback that narrows its scope of application. When used, this material emits chlorethylene, a toxic substance. Because of this, it cannot be used for water supply pipelines.
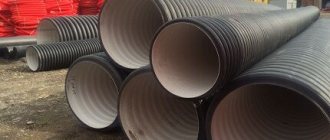
- Polyethylene pipes. Water supply and gas supply lines are made from them. During operation, this material does not emit harmful components, but to maintain technical characteristics, the tubes must be additionally insulated.
- Reinforced tubes. The reinforcing layer can be made of aluminum foil or fiberglass. Thanks to additional reinforcement, the scope of application of the parts is expanded.
Polypropylene pipes are also used for pipelines.
Polypropylene pipe for gas
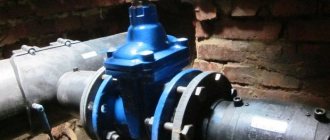
How are communications laid on a private plot?
If we are talking about gasification of a private (low-rise) house, then the described process and the use of PVC structures will have its own specifics. It is worth proceeding from the fact that all gas transport communications collected on the basis of the material under discussion and passing outside the premises (along the street) must be placed under the ground surface, these are the requirements of modern safety standards. It is impossible not to understand that this is an important advantage, because the pipes, being underground, will be reliably protected from the destructive influence of any specific nature, and even in the event of an explosion (an undesirable option, but it would be careless to exclude it) the soil layer will act as a reliable protection against damage to people and property . At the same time, any person who evaluates the situation from a logical point of view realizes: in order to place plastic gas pipes in a private house underground, it will often be necessary to damage sections of the transport infrastructure, which in itself is troublesome and undesirable. Which of the considered aspects is more important - each person will have to decide individually.
It is interesting to note that there are aluminum and fiberglass reinforced pipes, both internally and externally. Such products differ only in heat transfer. The most effective for heating are pipes with fiberglass. They have minimal heat transfer. You can find information about the combination of such materials here.
Advantages and disadvantages
Advantages:
- Resistant to long-term gas exposure.
- The service life is about 100 years, if the pipeline is not overloaded.
- High level of flexibility. Thanks to this, it is possible to manufacture highways of complex configurations.
- Low weight of individual elements.
- No sediment accumulates on the smooth walls of the product.
- The material is not susceptible to rust.
Flaws:
- Not resistant to high temperatures.
- Plastic pipelines cannot be installed outdoors, as the material loses its technical characteristics in the cold.
- When heated strongly, the material expands. Because of this, to increase the strength of connections, individual sections of the pipeline need to install compensators.
- Low resistance to ultraviolet rays.
If you do not overload the pipeline, it will not break down and will withstand decades of active use.
Threaded connection
Threaded connection
This method is used for both intermediate and end sections of metal pipes. If there is no thread on the pipe, it will need to be cut first. To do this you will need the following tools:
- klupp;
- lerka;
- lubricant;
- file.
Round die
Before starting work, it is necessary to determine what size the cutting should be. It all depends on what kind of connecting fitting or hose nut will be used. The sequence is as follows:
- The section of the gas pipeline that will be manipulated is blocked.
- The pressure is released if it remains inside.
- If necessary, a part of the pipe is cut out using a grinder or a hacksaw.
- Processing is carried out with a file. It is necessary to remove the paint layer and also prepare the chamfer so that the cutting tool can be easily put on.
- The surface is lubricated with machine oil, soap solution, grease or other suitable substance.
Threading diagramThe passage is carried out according to the standard one forward, half back. This means that for every full turn there must be a half turn back. Such actions will be required in order to promptly remove chips, which can damage both the coils themselves and the tool.
- The clamp is brought to the end strictly perpendicularly. This is important because if it is skewed, there is a possibility that the entire structure and the heads themselves will be damaged.
- Don't overdo it and take it by force.
- It is better to make a fine adjustment using a leveler. This is explained by the fact that the initial turns are deeper than the last ones. The die will even out this difference.
Read more about pipe threading technology here.
Required kit
Next, you need to seal the future joint. To prevent the winding from turning, before starting all actions, you will need to make perpendicular notches on the threads using a file or pliers. To do this, use tow or special Teflon tape. The latter should be denser than what is usually used on water pipes.
Sealing with tape
Linen should be well straightened. A small strand is separated from the main braid and leveled. The exact quantity required will have to be determined experimentally. The section is placed in the middle of the thread. One end makes 2 full turns. After this, the ends cross each other, one is placed under the other and another turn is made. Next, two parts are screwed on. The entire surface is coated with sealing paste. The required parts are connected:
Need a gasket seal
- In the case when a hose with a metal nut is screwed on, then a gasket-seal is also inserted into the middle. It will prevent leaks at the movable joint of the nut and the fitting on the hose.
Metal couplingTo connect two pipes in a straight section, you will additionally need a metal coupling with an internal thread, as well as a control nut. External threads must be present on two pipes. One of the parts is being packed. The coupling is screwed onto it to the maximum possible distance. A control nut is put on the second pipe. The pipe is brought to the joint and the coupling is unscrewed so that it begins to fit onto the thread of the other element. When the pipes enter it at approximately the same distance, you need to stop. The next step is to wrap the tow around the part of the pipe that was not packaged. Its quantity should be greater than for a conventional threaded joint. It must be wound close to the coupling. After coating with paste, fixation is carried out with a control nut. It is necessary to tighten until there is a gap of 1 mm between the nut and the connector. If the process was too easy, then this indicates that not enough sealant was applied, and vice versa.
- If the connection is made with a hose, and there is a special lip on the pipe where it will be fixed, then thread packing is not required. The spacer from the nut will press against the stopper and a sealed joint will be formed. It is better that the insert is made of paronite.
Note!
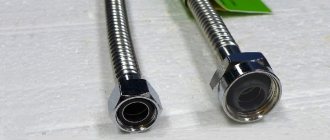
Some areas do not allow the use of stainless steel braided hoses. This is due to the fact that with strong bending, the internal part is damaged and the leak is difficult to detect. If it is not eliminated in a timely manner, the consequences can be catastrophic. In other cases, they do not allow the use of white PVC hoses and require the purchase of only black rubber ones.
Installation
When installing plastic gas pipes, you need to take into account a number of nuances:
- Due to thermal expansion, it is necessary to accurately select the location for installing expansion joints.
- Avoid many bends and joints of individual elements.
- Lay pipes away from sources of open flame.
- If you need to lay a pipeline underground, it is advisable to provide additional insulation. To do this, you can use a concrete channel or an additional plastic pipe.
- When dismantling the old system, it is necessary to make the main line from one material. This will allow you to achieve high strength and maximum service life.
- It is advisable to remove the pipes from open areas due to the low resistance of the material to mechanical stress.
- Fastenings to the pipeline on vertical surfaces should be installed no further than 2 meters from each other.
To create airtight connections, you need to use a special soldering iron. It comes with nozzles of different diameters, onto which pipes, couplings, and shut-off valves are placed. After heating, the parts are joined together. All you have to do is wait for the plastic to cool and perform a test run of the system. During the inspection, you need to carefully inspect the junctions of individual pipeline elements for leaks.
People are accustomed to seeing that gas pipelines are made of metal, but this material is gradually giving way to plastic. Polyethylene and polypropylene pipes are slightly inferior to metal in terms of technical characteristics, but are cheaper.
Features of installation work
Installation is carried out by butt or electrofusion welding using connecting parts with embedded heaters. The choice of welding method is determined by the diameter of the pipes, availability of access to the installation site, and budget requirements. Welding equipment can be rented, which allows you to reduce the cost of the finished pipeline if the project is a one-time project.
The manufacturer offers a wide range of complete shut-off and control valves and fittings for gas pipelines of any diameter, which makes it possible to easily install any section, including connection to existing steel pipes. If the technology is followed, the strength of the connections exceeds the strength of the pipe itself and guarantees the elimination of ruptures and other joint defects.
Qualified personnel who have been trained and regularly certified to work with welding equipment in accordance with the established work regulations are allowed for installation.
Copper soldering rules
If you need to solder a copper product or a product containing copper components, it is impossible to give a definite answer as to how and what is the best way to do this. The choice of method and tools depends on many factors, such as the size and weight of the parts, their composition. The load to which already soldered products must be subjected is also taken into account. There are several soldering methods, and it is better to know them all so that, if necessary, choose the most suitable one.
Soldering large parts
Scheme of capillary soldering of copper.
If you need to solder massive or large parts that cannot be heated to the required temperature with a soldering iron, a torch and copper solder are used. The flux in this case is borax. The strength of copper-phosphorus solder is higher than that of standard tin.
A thin layer of flux is applied to the mechanically stripped pipe or wire. After this, a fitting is put on the pipe, also mechanically cleaned. Using a gas torch, the joint is heated until the flux-coated copper changes color. The flux should become silver in color, after which you can add solder. The solder melts instantly and penetrates into the gap between the pipe and the fitting. When drops of solder begin to remain on the surface of the pipes, the solder is removed.
The pipes should not be overheated, as this will not promote a greater capillary effect. On the contrary, copper heated to blackness is less amenable to soldering. If the metal begins to turn black, heating should be stopped.
Soldering wires or wires
To solder thin copper wires, do not use zinc chloride solder as it will destroy the copper. If there is no flux available, you can dissolve an aspirin tablet in 10-20 ml of water.
Scheme of copper welding in an inert gas environment.
Copper wire or parts made of wire of various sections can be easily heated to the desired temperature using a soldering iron. The temperature regime should be the one at which the solder, tin or lead-tin, melts, and this is what soldering is done with. Fluxes must contain rosin or be made on its basis; solder oil or even rosin itself can be used.
The surface of the wire is cleaned of dirt and oxide film, after which the parts are tinned. This process involves applying a thin layer of flux or rosin to heated copper, and then solder, which is distributed over the surface as evenly as possible using a soldering iron. The parts requiring connection are connected and heated again with a soldering iron until the already solidified solder begins to melt again. When this happens, the soldering iron is removed and the connection cools.
The parts can be clamped in a vice so that the distance between them is 1-2 mm. Flux is applied to the parts and heated. Solder is brought to the gap between the hot parts, which will melt and fill the gap. The melting point of solder for soldering using this method must be lower than the melting point of copper so that the parts do not become deformed. The part cools, then it is washed with water and, if necessary, sanded with sandpaper until smooth and uniform.
Soldering utensils or soldering holes in copper
When soldering dishes, they use pure tin, the melting point of which is higher than that of tin or lead-containing solder. Sometimes, to solder large parts, hammer soldering irons are used, heated over an open fire with a gas burner or blowtorch. In the future, everything happens according to the standard scheme: stripping, flux and tinning, joining parts and heating with a soldering iron. It is for this soldering iron that pure tin solder is convenient.
On the inside, the fitting usually has a border that prevents it from being threaded through the pipe. It can be removed using a coarse file if the fitting needs to be pushed onto the pipe further than intended and thus soldering an unnecessary hole.