It is well known that any plumbing work is one of the most highly paid, although many of them can be carried out independently, saving considerable money. Operations that are easy to do with your own hands without using a special tool include cutting into a 110 mm sewer pipe.
There are several ways to connect to the sewer; the methodology is different for metal and plastic pipelines. When deciding how to cut into a sewer pipe, it is also necessary to study the technology for connecting to vertical and horizontal lines.
Rice. 1 Types of fittings for connecting pipe parts
Insertion into a sewer riser
You can make a tie-in in the case of a sewer riser using different methods, and before you make a tie-in into a sewer pipe, you need to figure out how to do it.
A standard sewer riser is equipped with 110 mm plastic pipes. When connecting pipes to a central sewer with a diameter of less than 50 mm, you can use an adapter, but for other cases it will not be suitable. For example, if there are other apartments above the insertion point, then the protruding parts of the pipe can interfere with the downward movement of drains, as a result of which the system becomes contaminated, up to a complete stop of its operation. If we take this aspect into account, then inserting a 50 mm pipe into the sewer riser will be carried out in exactly the same way as the connection was made using an adapter. The most important point in this case is the choice of the insertion location to ensure a sufficient slope for the inserted pipeline.
Cutting into a cast iron sewer pipe with a diameter of 110 mm will be a much more complex undertaking, especially compared to cutting into a plastic sewer pipe. However, this problem is also being solved. To implement such a connection, you will need two fittings - a tee and a compensator. A tee is required for the connection itself. When choosing a tee, you need to rely on the diameters of the pipes that need to be connected. A compensator is, in fact, a piece of pipe that has a variable diameter. The wide part of the compensator is put on the riser from its lower part. Next, the opposite part of the structure is installed in the tee, as a result of which the riser is reconnected.
To install these fittings for sewer pipes, you need to make accurate calculations. The most important indicator is the height at which the tee will be located. The outlet of this fitting must be at an appropriate level to ensure normal slope of the pipeline. It is also necessary to calculate what part of the riser will be in the socket of the tee, and find the bottom point at which the riser will be cut.
The upper mark also needs to be calculated. The cutout of the riser should be slightly longer than the length of the compensator so that the latter can be placed under the sewer riser. To find the upper level, it is enough to sum up the length of the compensator and the level of the lower mark.
Before starting the tapping, you need to complete the following work:
- Shut off the riser throughout the entire house.
- Prepare tools for performing work and cleaning after work.
- Clean and dry the riser in the area that will be repaired.
The sewerage connection itself into the existing network will be carried out according to the following principle:
- first, part of the riser is cut off, observing the design points (it is advisable to file the edges);
- the connection point of the compensator is treated with sealant;
- then the compensator is put on;
- now you need to cover the lower part of the riser with sealant;
- at this stage the tee is installed (before installing it, you need to check whether there is a seal in the tee);
- the lower part of the compensator is sealed;
- now the compensator is installed in its place;
- Next, you need to connect the pipelines or install a plug at the connection point;
- At this point the work is completed, and the riser can be started again, after which all debris must be removed. The connection to the city sewer system has been completed.
Inserting an additional pipeline into a sewer pipe is not particularly difficult, but experience in construction is welcome. In some cases, it is worth using the services of specialists to avoid possible troubles that may arise due to unprofessional work.
Why do this?
Typical reasons for tie-ins include:
- Connecting another plumbing fixture. This could be a washing machine, washbasin, bidet. Any device for which no output was initially provided.
- When adding a new room, connecting its communications to the existing riser.
- Insertion of a new house (apartment or individual) into the general sewer system.
Note! Independent illegal tapping in the case of a citywide system is prohibited. This can only be done by specialists from the relevant utility services.
The right way
Materials
Before embarking on military operations, you need to thoroughly prepare.
First, let's stock up on everything we need.
- For the cast iron pipe to which we want to connect, we will need a turbine with a metal stone. Experienced mechanics simply make notches with a chisel, knock out a piece of pipe and use the same chisel to straighten the edges, but you do not have their experience. If so, let's not take risks.
- For PVC or polyethylene, you can get by with a regular hacksaw. Whether it's metal or wood, it doesn't matter. At the same time, stock up on a file - it’s better not to leave burrs inside the sewer.
- Tee. The same diameter as the pipe, or with a transition to a smaller diameter, a straight tee or an oblique one - see for yourself. Plastic - with cast iron there is more fuss. All three branches of the tee must have necks and O-rings.
- The compensating pipe is the same diameter as the pipe to which we expect to cause secret damage. This is a short pipe that thickens to a slightly larger diameter for most of its length. Of course, it is also better to take plastic rather than cast iron.
- If you do not plan to use the connected sewer immediately, a plug for the tee will be a good addition. There will be a smell from the sewer. Why, it stinks like hell.
- Silicone sealant completes the list.
Psychological preparation
If we are talking about a riser, we punctually go around to all our upstairs neighbors, tearfully begging them not to use the sewer at the appointed time. We leave notes for those whom we cannot find at home.
On the warpath
First we need to clearly imagine what we want to do.
We will need to cut out a section of the riser (or other pipe), pull a tee on one side, and a compensating pipe on the other (upper, if we are talking about a riser), and then move the compensator, inserting its narrow part into the tee.
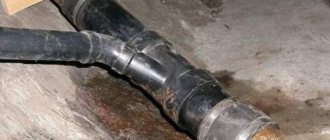
The photo gives an idea of what should happen in the end. Instead of a tee, a cross is placed here
This understanding is necessary in order to cut exactly as much pipe as needed, and where needed. Have a clear idea of where each fitting will be located. The distance between the cuts will be equal to the length of the compensator.
And only after that go into battle.
- Cut out a section of the riser.
- Quickly remove the burrs with a file. They will be on both plastic and cast iron.
- We coat the outer side of the pipe where the compensator will be with sealant directly near the cut.
- We pull the compensating pipe onto the pipe completely, so that there is room for putting on the tee.
- We coat the second pipe we cut with sealant and put the tee in place.
- We coat the narrow side of the compensator with sealant and place it on the pipe so that the narrow side fits tightly into the socket of the tee.
- We plug the tee with a previously stored plug or continue assembling the sewer from the tee.
The sealant not only protects against leaks, it also acts as an adhesive.
https://youtube.com/watch?v=hfPiOirjN2g
Important advice from professionals on tie-in issues
When planning to carry out such a responsible process, pay attention to the following advice from experts in this field:
- to work with polyvinyl chloride or polyethylene pipes, you will need a file, which will remove burrs inside the pipes, as well as a hacksaw for wood or metal (any blade will do);
- when inserting into a cast iron structure, you should take a chisel to knock out parts of the pipe or a turbine equipped with a stone for processing metal material (professional plumbers work well with a chisel, but amateurs are better off using this unit);
- if the “modernized” sewerage system is not connected immediately after the completion of the tapping operation, it is necessary to purchase and install a reliable plastic plug on the tee, which will protect you from unpleasant “odors” from the sewer network;
- It is better to take a tee from plastic; with a product made of cast iron you will have much more problems, but the shape of the tee (oblique or straight) does not really matter.
Finally, let’s add that you don’t need to be lazy and go around to all your upstairs neighbors, asking them not to use the sewer system during the time you are making the connection. Otherwise, the success of the planned operation depends solely on your abilities.
Sources
- https://pro-kanalizaciju.ru/vnutrennyaya/vrezka-v-kanalizatsionnuyu-trubu.html
- https://septikexpert.com/vidy-kanalizacionnyx-rabot/montazh-kanalizacii/vrezka/
- https://zen.yandex.by/media/samastroyka/ne-povtoriaite-chujih-oshibok-kak-vrezat-trubu-v-kanalizacionnuiu-iamu-pravilno-5e722d126215c37308e1c982?from=feed&rid=2355326518.554.1586715621734. 94742&integration=site_desktop&place=layout&secdata =CJiNjvCOLiABMAJQDw%3D%3D
- https://trubyda.ru/kanalizacionnye/vrezka-v-chugunnuyu-truby
- https://stroy-block.com.ua/kanalizacyiya/443-kak-sdelat-vrezku-v-kanalizacionnuyu-trubu.html
- https://ZnatokTepla.ru/truby/instruktsiya-po-vrezke-v-kanalizatsionnuyu-trubu-svoimi-rukami.html
- https://gidroguru.com/vnutrennyaya-kanal/operac/sborka/12-vrezka-v-kanalizacionnuyu-trubu
- https://tutmet.ru/vrezka-chugunnuju-kanalizacionnuju-trubu-vodoprovoda.html
[collapse]
Similar posts:
- Installing a heated towel rail: how to install...
- How to connect a toilet to a sewer: installation diagrams and…
- How and with what to clean sewer pipes in…
- Location of sockets in the kitchen: diagram with dimensions,…
- Do-it-yourself wiring in a bathhouse: step-by-step instructions...
- Corrugation for toilet
Insertion into a vertical pipe of the same diameter
The work is completed as quickly as possible. Stock up on a bucket to prevent sudden drains, and wear work clothes.
For tapping into the riser, it is better to use a plastic oblique tee. This makes it easier to clean the system if it is clogged. It is oriented against the direction of wastewater flow. Such tees are available for both plastic and cast iron pipes.
The sequence of operations when connecting a tee or cross is as follows:
- We mark the riser. The length of the cut part must be equal to the height of the compensator;
- Cut off part of the pipe. We saw through the plastic one with a hacksaw, and the cast iron one with an angle grinder (grinder).
Be careful not to hit the cast iron pipe with a chisel or hammer to avoid cracking this fragile metal. Then we put a bucket on the top of the riser to prevent drainage from forgetful neighbors, having first secured the overhang to the wall;
- We clean the cuts from burrs or rust, remove the external chamfer;
- Lubricate the joints with soapy water or cream. To avoid cracking of rubber seals, do not use machine oils for lubrication;
- We put a compensator on the upper part, a tee or cross on the lower part (and before that a coupling, if necessary). We install the compensator into the tee (crosspiece);
- We coat the joints of the plastic parts with sealant. Joints with a cast iron system are sealed with a heel, graphite gland or cement mortar without sand.
Installing the adapter
Installation on cast iron and plastic sewer pipes. The sequence of actions is as follows:
- A hole with a diameter of 50 mm must be made in the sewer pipe. In a plastic or asbestos pipe this can be done with a core drill. And to tap into cast iron, you may have to use gas cutting. If the pipe is located horizontally, a hole is made in its upper part;
- The edges of the hole, in order to avoid blockages in this place, are cleaned of burrs or rust;
- The place where the adapter will be installed is coated with sealant;
- The adapter is installed in the hole and secured with bolts or clamps.
Insertion into a cast iron pipe with a transition to a section made of plastic
The sequence of work for connecting to a cast iron pipe with a high-quality transition to a new section:
- This is how a connection is made to systems of standard sizes; the diameter of the sewer section is, respectively, 110 mm. In this case, drilling a hole with a “crown” is labor-intensive, so we recommend making a marking and a crosswise cut using a grinder, then removing the internal segments of the joint. The hole will turn out to be in the form of a diamond, but this does not interfere with the quality of the work.
- Next, the fastening is done using unigum mastic or similar; a layer up to 5 mm thick and 3-5 cm wide is applied around the hole.
- If there is no jimten drain, it can be cut from a plastic sewer element with a 50 mm adapter.
- The cuff is attached to the mastic. Tighten it with clamps.
The proposed method provides a reliable and aesthetic solution to the problem of the transition between the old and new sections of PVC sewerage. It is recommended by experts for open areas, for example, to connect to a sun lounger in the basement. Such a connection must be checked periodically, although the materials used guarantee a durable connection that does not require additional maintenance.
Safety features when performing work
Installation work is closely related to the implementation of safety precautions. Following the rules will help avoid injury and equipment damage. Since a lot of unpleasant odors appear when working with sewerage, it is necessary to ensure the installation site has good ventilation. Working with power tools on wet equipment requires special attention and the use of protective equipment against electric shock.
To prevent the tool or dismantled parts from falling into the shaft, they must be secured and removed from the installation area after cutting. When working with electric cutting tools, be sure to wear a protective mask or goggles. Work should only be carried out with gloves. This will protect your hands from damage and infection.
Following the simplest rules will reduce the risk of injury and improve the quality of work.
Correct and incorrect ways of tapping
In a situation where we have a sewer pipe and the need to install a sewage disposal system into it, we need to know the rules and requirements for performing this task. Let's find out ways to perform this action. So, tapping into a sewer riser can be done correctly or incorrectly. Let's look at each of them.
The right ways to cut in
To complete this task, the first thing we do is stock up on the necessary materials. Namely, we will need the following components:
- A compensator that will be needed when inserting into a cast iron water supply system. Craftsmen mainly use a chisel to make the notches that need to be applied to the pipe.
- If the pipe is made of PVC or polypropylene, then a hacksaw and file will be useful;
- A tee that will be identical in diameter to the pipeline. It is worth noting that all three outlets must be selected with a neck and seal rings. It is up to you to decide which tee to choose: straight or oblique.
- Compensation pipe. For these works, preference should be given to the plastic type;
- In the event that you do not plan to operate the sewer immediately, you will need a plug for the tee;
- Silicone hermeneutic.
If we plan to install the system on a riser, then the first thing we need to do is ask our neighbors not to use the sewer system during the work period. We recommend preparing rags and a basin, as very often residents forget about such requests. After this, the cutting process can begin. It is carried out in the following sequence: Rules for installing a septic tank on the site
- First, cut out a piece of the riser;
- We clean the burrs with a file;
- We seal the external and internal area;
- We stretch the pipe onto the pipeline so that the tee can be put on;
- Apply sealant to the area and put on the tee;
- We continue assembling the sewer system or plug the tee.
The most popular insertion methods today are:
- Through a tee;
- Adapter.
With the first method, you need to cut out part of the pipe, put a pipe on top of it and install a tee. If there is a need to increase the fastening, then install a clamp. It is worth noting that if the penetration is made into a plastic structure, then you need to use a trim pipeline instead of a solid pipe.
The second method is a device with a transition. It is worth noting that this installation option is modern and more reliable. To implement it, you need to adhere to the following sequence:
- Shut off the water flow;
- Make a hole with a drill with a suitable attachment;
- If the adapter has bolts, they need to be tightened;
- If they are not available, then remove the fat from the surface and tighten the nut.
Incorrect insertion
If we have a horizontal pipe, then we simply make a hole and fix our insert structure, no matter from the top or the side. This process cannot be carried out secretly, so it can also take place with the permission of your neighbors
It is worth noting that plumbing services call this method incorrect, since it leaves marks on the connections in the form of various burrs.
The nuances of working on a water pipeline under pressure
For insertion into the pressure pipeline, electric-welded saddles and clamps with a built-in cutter are used. It is located in a special sealed nozzle housing. To drill into plastic, it is often enough to turn it with a hex key. But there are also models for a drill.
The presence of a sealed branch with a cutter inside ensures that there is no splashing of water when drilling a pipe under pressure
Some similar designs have a built-in valve. Then, after drilling is completed, the cutter is raised, the valve is closed, and the attachment with the drill is removed. Instead, a drain pipe is installed.
However, there are also products on sale with a discharge pipe, which is directed sideways from the drill (parallel or at an angle to the connected water supply).
The use of linings with an internal cutter allows you to cut into any water pipes. It doesn't matter whether they are under pressure or not. But such attachments are much more expensive than conventional clamps and saddles.
They greatly simplify the insertion process, but you will have to spend money on them. At the same time, in terms of the tightness of the resulting connection, they are neither superior nor inferior to standard solutions.
How to make a tie-in
Traditionally, when inserting PVC, PP or PE into a plastic sewer pipe in a private house or apartment, you will need to buy special adapters. These parts are selected from the material from which the pipeline is made. They cut into the right place in the communications, are secured and form a convenient and sealed outlet for connecting additional communications.
Flange
Flanges can be used to insert into a polypropylene or polyethylene sewer pipe of small diameter. To install such devices you only need a hole in the line
Before starting work, turn off the water, drill a hole, it is very important that its size exactly matches the selected flange, otherwise the tap will not be effective or will begin to leak over time. Clean it of dust and plastic shavings
Video: how to make a tap into a sewer pipe under pressure.
Lubricate the inside of the hole and the outside of the drilled pipe with sealant. Then install the flange connection on the line and tighten it tightly using the clamps on the top of the fastener. Due to the sealant on the outer section of the pipe, the insert will be strong and completely sealed. Tip: be sure to wipe the pipe before starting work; it must be completely dry. Do not turn on the water until the sealed mastic has completely hardened; on average, this takes 8 hours.
Photo: flange for external sewerage
How to cut into a plastic pipe:
- Before starting work, you need to turn off the water in the riser, otherwise the pipes may burst when drilling a hole;
- After this, you need to drill a hole in a certain location. Make sure that the size of the future insertion point corresponds to your needs and the size of the adapter;
- Clean the hole with slightly abrasive sandpaper, then treat it with degreasing mixtures;
- All that remains is to install the adapter into the pipe and secure it with a bolted connection. Do not overtighten the bolts to prevent the line from bursting or cracking. It is advisable to treat the joint area with sealants or mastics to form a strong and airtight fastening.
Depending on the diameter of the sewer pipe, you need to choose the right adapter for tapping, for example, for 110 mm you will need adapter 50. To branch communications up to 50 mm, connectors from 20 to 32 mm are used.
Branch pipes for tapping into cast iron pipes
To insert into a cast iron or metal sewer pipe, you will need a piece of a similar hollow communication. Such a system is successfully used in a private home or country house, especially for arranging external non-pressure communications. How to make a branch using pipes:
- Determine exactly where you need the tie-in, then mark this place on the drawing of the sewer system and turn off the water;
- Using a drill with the appropriate attachment, drill a hole of the required diameter. Be careful to ensure that there are no chips left at the processing site that could damage the communication;
- Clean the hole from dust, metal fragments and dirt, degrease the surface;
- Insert a pipe into the communication. In this case, you need to be extremely careful: by pushing the adapter too deep, you can create an obstacle to the normal flow of water. The optimal distance is 5 mm from the hole wall;
- Having installed the pipe adapter at a certain distance, weld it to the line;
- Treat the seam area with special compounds that will protect it from corrosion and destruction.
After finishing the work, wait a few hours until the seam has completely hardened, and you can turn on the water. It is recommended to lubricate the fasteners periodically to prevent rusting.
Tools required for work
Insertion into a plastic sewer pipe is carried out using an additional tool. For those who plan to carry out the work themselves, you will need to have:
- Electric drill or screwdriver. For drilling a hole in a plastic pipe.
- Set of crowns for plastic or wood.
- Grinder with carbide disc.
- Stationery knife, for cleaning edges.
- Caulk gun.
- A hacksaw, jigsaw or other similar tool that can be used to cut a plastic pipe.
- Welding machine (when working with metal pipes).
- Gas cutter (when working with cast iron pipes).
And of course you will need a hammer, tape measure, pencil and other small tools that every self-respecting owner should have.
Insertion into a sewer pipe
Sometimes it becomes necessary to connect an additional plumbing fixture to an already operating sewer system. For example, when purchasing a washing machine or dishwasher, in order to connect it you will need to make a connection into the sewer pipe.
For a professional plumber, such work is not difficult. But for a person who does not have experience, it is necessary to study the rules and methods of connection so as not to disrupt the operation of the system.
Reasons for the tie-in
There can be many reasons for crashing into a sewer. Here are just some of them:
- Connecting a new plumbing fixture.
- Transfer of devices to a new location, in case of redevelopment, etc.
- Connecting the house to the central sewer system.
In the first option, there is a connection to the in-house system, so there should be no complications as such. In the second case, if there is a need to cut into the central riser of an apartment building, there is a risk of being flooded with drains from the upper floors. Therefore, it is better to agree in advance with neighbors about the time of work and limiting the use of sewerage.
When connecting a house to a centralized sewer system, it is necessary to negotiate with utility services so that the water supply is shut off at a certain time. In this case, housing and communal services have the right to issue you an invoice for certain work.
Methods of inserting into the system
There are several ways to cut into a sewer pipe; the choice depends on the material and diameter of the pipes, the location and method of their location. In order to cut a pipe of a smaller diameter into a larger one, a special adapter is used, and if the diameters are equal, a tee or cross is installed.
Installing the adapter
This method is suitable for both plastic and cast iron pipes. The work is performed in the following sequence:
- A hole ∅ 50 mm is made in the pipe. This can be done with a drill and a special bit, but for cast iron you may have to use a cutting torch.
- The edges of the hole are cleaned of burrs using a file or sandpaper.
- The adapter installation location is lubricated with sealant.
- The adapter is installed and secured with clamps and bolts.
Tapping with a tee
When tapping into a cast iron pipe, you need to cut a part of it exactly to the size of the tee. After this, the connection is welded; it is better to trust such work to an experienced welder. It is much easier to cut a tee into a plastic pipe and you can do it yourself.
To do this, part of the pipeline is replaced with two short sections, between which a tee or pipe with a pipe of the required diameter is installed. The only difficulty may arise when connecting the sockets.
Insertion into a plastic pipe
Work process:
- We take a piece of pipe with a pipe of the required diameter.
- We prepare the workpiece - we cut out the pipe and part of the pipe so that it reliably covers the insertion point (you can simply cut it lengthwise).
- In the pipe into which we are cutting, we drill a hole, the diameter of which coincides with the pipe.
- Apply sealant to the inner surface of the workpiece and the pipe.
- We apply the workpiece and tighten it with clamps until the sealant appears.
This method can be used for both plastic pipes and any others.
Insertion into a vertical riser
When tapping into a riser, the first thing you need to do is negotiate with your neighbors so that they do not drain the water for some time. All subsequent work must be completed as quickly as possible.
For the riser, the best option would be to use a plastic oblique tee. This will make it easier to clear the blockage in the future. Such a tee is available for plastic and cast iron pipes; the direction of the pipe should be against the flow of wastewater.
- Marking - the length of the cut section must be equal to the height of the compensator;
- We cut out a section of pipe - plastic can be sawed with a hacksaw, cast iron with a grinder.
- Cleaning the cut from burrs and rust.
- The joints are lubricated with soapy water or cream.
- A compensator is put on the top, a coupling on the bottom (if necessary), then a tee or cross;
- The compensator settles into the tee;
- The joints of plastic pipes are coated with sealant, while cast iron pipes are sealed with caulking or cement (without sand) mortar.
Insertion into a horizontal pipe
The sequence of work is practically no different from the previous one:
- We cut off a section to the size of the tee without taking into account the socket;
- We remove burrs;
- Lubricate with soap or cream;
- We connect all the parts, use a coupling if necessary;
- We treat with sealant.
If the insertion into the sewer pipe is done well, this will allow you to add an additional device. The main thing is that all work is carried out carefully, then you will not have to redo the entire system.
Required tools and supplies
The advantage of sewerage installation is its relative simplicity - the entire system is assembled from ready-made standard units of the same size, sealing is ensured by built-in gaskets, and no special equipment is required for installation. When cutting, the following household tools and consumables are usually used:
- Hacksaw or grinder. During the assembly process, the main operation using a tool is cutting elements made of plastic or metal. In the first case, a simple hacksaw with a fine tooth is enough to cut any materials; you can use a grinder with a disk for stone or metal; cast iron parts can also be cut using the latter method.
- Crowns. For cutting into a 110 mm pipe. make a 50 mm hole. This operation can be performed in plastic using inexpensive crowns of the specified size; for cutting holes in metal, there are also bimetallic crowns, the cost of which is quite high. Holes in cast iron can be made with a regular metal drill or a gas cutter.
- Adjustable wrench or wrench. The tool will be needed when using the adapter as a pipeline penetration system.
- File or sandpaper. When cutting water pipes, it is necessary to get rid of the burrs that remain inside - this can lead to a blockage. To clean protruding surfaces outside and inside the end, use a file, sandpaper, or a painting knife.
- Sealant. To facilitate the operations of connecting pipeline components and sealing joints, laundry soap and sealants are used.
Methods for inserting into a 110mm sewer pipe
If you understand that the sewer system in your home is beginning to malfunction, then you should not hesitate to repair it, because this could end in disaster and entail large financial expenses.
Tapping into a sewer pipe is one of the ways to connect to a riser to ensure wastewater disposal.
Those who try to do this with their own hands are always faced with the choice of how to carry out this procedure. Existing insertion options can be divided into correct and incorrect.
Connection to the sewer pipe (correct insertion)
Method number 1 is correct
Possible option for inserting into a PVC pipe
Before cutting into a sewer pipe, you need to prepare accordingly, namely, select the necessary tool and material.
If you plan to connect to a cast iron pipe, then you will need a turbine with a stone for metal.
You can also make a cut on a PVC or PE pipe using a regular hacksaw, and to avoid leaving burrs, it doesn’t hurt to stock up on a file.
The most important element is the tee, which should be the same size as the pipe, sometimes a slightly smaller diameter is allowed.
The tee itself can be oblique or straight; the material is better to choose plastic. Don’t forget about the compensating pipe; its diameter must match the pipe.
Sometimes a plug for the tee may be required; silicone sealant is a must.
Plastic tee for inserting into the sewer
Before you begin, you must clearly understand what you have to do.
So, the correct insertion into the sewer pipe 110 occurs as follows:
- A certain section of the riser is cut out.
This is what a prepared hole looks like for connection to the riser
File, for deburring
Sealant must be used
Method number 2 is wrong
They resort to it when the pipe cannot be cut or it is necessary to install a drain of a smaller diameter.
An object called a sewer tap is used for this.
This is a kind of cover for a sewer pipe, which has a perpendicular outlet and a special fastening system.
This is what a sewer pipe cover looks like
If an insertion into a horizontal cast-iron sewer pipe is necessary, then a hole of the required diameter is simply drilled in it, and a cover plate is fixed opposite it.
The question arises, why is this method considered “wrong”?
This is because after the procedure a lot of burrs remain inside the riser, and protrusions form.
But even minor changes in the diameter of the pipe entail frequent blockages and leakage of the riser.
Overlay on a cast iron sewer pipe
How to correctly cut into a plastic and cast iron pipe?
There is a way by which cutting into a plastic sewer pipe can be done without cutting it.
To do this you need:
prepare a piece of new pipe with a pipe of the required size;
This is what the pipe looks like
This is how holes are drilled in a PVC pipe
Attaching the pipe using clamps
It is worth noting that if high water pressure is not expected in the pipe, then you can do without clamps.
Tapping into a cast iron sewer riser is a little more complicated.
- You need to make marks on the pipe, and in accordance with them, use a grinder to cut out a piece of cast iron.
Tapping into a cast iron pipe
This is what a plastic adapter looks like on a cast iron pipe
Plastic tee on a cast iron pipe
If you plan to install a plastic tee in the socket of a cast iron pipe, then you need to cut off its edge, then clear the connection in the socket, clean the cut edge and lubricate it with silicone, and clean the socket of dirt.
Next, a cast iron-plastic adapter is put on the cut edge, then a slip coupling, a rubber adapter is inserted into the cast iron socket, and only then a tee.
Plastic tee installed in a cast iron socket
This completes the 110 mm sewer insertion.
Insert with tee
If a pipe that exactly matches the diameter of the main sewer pipe cuts into the drainage system, a standard tee can be used for connection.
For work you will need: a hacksaw, a file, a plastic tee with a plug, silicone sealant and a special compensating pipe - a piece of pipe with a variable diameter.
Tees for inserting into sewer pipes
Before you start inserting, you should determine the height of the tee as accurately as possible. The latter should be located at such a level that the pipe connected to it is at a slight slope - such a position will ensure effective drainage of sewage into the general system.
After the preparatory work, you can proceed to the direct insertion into the sewer:
- Cut a piece of sewer pipe that exactly matches the length of the tee being connected.
- Using a file, process the inside surface of the pipeline to remove all burrs.
- Treat the outside of the pipeline with sealant.
- Place a compensating pipe on the first truncated sewer pipe - insert it from the bottom up with the wide part.
- Mount a plastic tee on the second truncated pipe.
- Treat the narrow part of the compensating pipe with sealant and press it tightly into the tee socket.
Sealant treatment
- Seal all pipe and tee joints.
- Place the plug on the tee.
Insertion into a plastic pipe
To insert a bend into a plastic pipe, perform the following steps:
- Prepare a segment with an outlet of a suitable diameter.
- They make an overlay. The branch and the part placed on the pipe must cover the insertion point with a margin.
- Form a hole. The diameter must match the size of the outlet.
- The internal surfaces of the workpiece are treated with sealant. The composition is also applied to the areas to which the overlay will be connected.
- The workpiece is secured with clamps, pressing it tightly to the sewer line. When tightening, do not use excessive force. After drops of silicone appear from under the pad, work is stopped. Excess composition is removed with a clean rag.
Using an adapter, you can install a branch whose diameter is 2 times smaller than the size of the sewer pipe. The pipe is connected to the horizontal line from above or at an angle of 45 degrees. The connected pipe should not interfere with the drainage of wastewater.
Insert into a horizontal pipe.
The insertion is done like this:
The area to be inserted is washed and dried. A hole is made in the pipe corresponding to the diameter of the connected pipe. For an element with a diameter of 5 cm, this value is 2.2 cm, for a pipe 11 cm - 5 cm. A core drill is used to form a hole. The adapter is treated with sealant and secured with clamps
The fasteners must be tightened carefully, otherwise the plastic elements may be damaged. A rubber cuff and a connecting pipe are inserted into the adapter outlet.
Preparatory stage: recommendations
Preparation for pipe installation includes the following steps:
- Determining the method and purchasing the necessary plumbing parts. When purchasing materials, take into account the type of pipeline connected to the connected device. The bend of the horizontal line should have an obtuse angle. This prevents the formation of blockages and ensures normal operation when discharging multiple water flows. The elements connected to the riser are installed at right angles.
- Selecting the type of toilet outlet. It is placed at an angle or horizontally. There are no difficulties with the choice of components; with direct connection, you purchase an eccentric (output with an offset axis).
- Coordinating the start time of work with other residents of the house. During the period of sewer pipe insertion work, neighbors should not use the water supply.
