When dealing with sewerage, you cannot do without such a process as soldering PVC pipes. It has its own nuances, like any work with the sewer system.
Joining pipes made of this material is easy to do with your own hands, if you take into account the main nuances. But welding must be treated responsibly in order to avoid serious mistakes.
Draw a pipeline diagram
YouTube channel “Do-it-yourself repairs” Connecting polypropylene pipes is quite simple, but - as with any other structure - it is advisable to prepare an approximate installation diagram before starting work.
The Lifehacker Telegram channel contains only the best texts about technology, relationships, sports, cinema and much more. Subscribe!
Our Pinterest contains only the best texts about relationships, sports, cinema, health and much more. Subscribe!
Sketch out a drawing on paper with the location of the insertion points, shut-off valves and other necessary parts. This way you can immediately estimate the length of the pipes, as well as determine the location, type and number of fittings needed.
Since both ends of the pipeline heat up during connection, for ease of installation it is important that one of them remains free. Some pipes with fittings can be assembled on a table and then installed in the desired location, making just one joint. All this will help to provide an assembly diagram.
Prepare your soldering iron
In general, the device is correctly called a “welding machine.” The process of joining polypropylene takes place without the use of solder, which means it is welding and not soldering. We will use both terms.
YouTube channel “Twice Father Dmitry”
Install nozzles of the required diameter onto the soldering iron platform and secure them with a screw using a wrench. If you are working with pipes of several sizes, use an additional pair of sleeves.
Set the heating temperature to 260 °C and turn on the device. It will take 10–20 minutes to heat up. An LED indicator will indicate that it is ready for use. You need to wait about 5 more minutes before welding the first joint.
When polypropylene is heated, harmful fumes and smoke are released, which should not be inhaled. Therefore, ventilate the room while working.
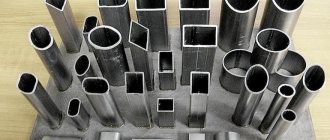
Required Tools
To start soldering, you should prepare:
- welding equipment for working with pipes made of plastic;
- building level;
- roulette;
- marker;
- special scissors.
Almost every home craftsman has all of the above tools, except for a welding unit. When soldering PVC pipes with your own hands is planned to be done once, then it is better to rent welding equipment than to purchase.
Before you begin the soldering process, you should familiarize yourself with the design of this device. Its main element is the sole, which is equipped with heating elements. Thanks to the presence of special holes in the device, you can fix special attachments for welding work. To regulate the temperature regime, the unit has a thermostat located on its body.
Make the markings
While the soldering iron is heating up, prepare the pipe and fittings. For high-quality welding, they must fit into each other strictly to a certain depth. Insufficient immersion will lead to a poor connection, and excessive immersion will reduce or completely block the flow area with extruded plastic. Here are the values recommended by most manufacturers for the most common sizes:
As you can see, the soldering depth depends on the diameter of the pipes and fittings.
YouTube channel FV Miano
To avoid mistakes, measure the required length of the pipe, taking into account the allowance for the joint, and mark it with a pencil. Then, at the required distance from this mark, draw another line - it will serve as a guide during welding.
termpro.ru
For example, we need to connect an angle and a tee in a heating system. The distance between them is 270 mm. For fittings with a diameter of 25 mm, the soldering depth is 18 mm, which means we add another 36 mm to 270 (18 on each side). The result is 306 mm - this is exactly the piece of pipe that needs to be cut off.
Cut the pipe
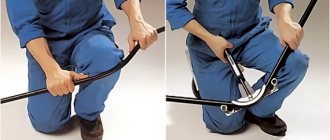
To cut polypropylene, special scissors are used, which are also called pipe cutters. They make it easy to cut off a thick-walled pipe and get smooth edges without burrs.
YouTube channel “Sergey Efimov”
Place the scissors exactly perpendicular to the pipe and align the blade with the first mark. Holding the pipe with one hand, press the handles of the scissors with the other until the part is completely cut.
It is important to get an even end so that the pipe fits evenly into the fitting and is soldered equally over the entire diameter. If you cut it at an angle, the protruding part will go in too deep and the molten polypropylene will squeeze out, reducing the inner diameter of the fitting.
If the edge turns out to be uneven and the margin allows, it is better to cut it again. If the length is close, trim the end, removing all excess with a sharp knife.
Impact of errors on welding quality
Unhurried, carefully considered actions are a guarantee against mistakes that can ruin all the work. You should take into account all the little details of soldering technology and not deviate one step from them.
Common mistakes that result in defective components of the installed propylene water supply network:
- The surface of the pipe has not been cleaned of grease film.
- The cutting angle of the mating parts differs from the value of 90º.
- Loose fit of the end of the pipe into the fitting.
- Insufficient or excessive heating of the parts being soldered.
- Incomplete removal of the reinforced layer from the pipe.
- Correcting the position of parts after the polymer has set.
Sometimes on high-quality materials, excessive heating does not produce visible external defects. However, internal deformation is noted when molten polypropylene closes the internal passage of the pipe. In the future, such a unit loses its functionality - it quickly becomes clogged and blocks the flow of water.
If the cut angle of the end parts differs from 90º, at the moment of joining the parts, the ends of the pipes lie in a beveled plane. A misalignment of parts occurs, which becomes noticeable when a line several meters long has already been installed.
Often for this reason it is necessary to redo the entire assembly again. Especially if pipes are laid in grooves.
Poor degreasing of joint surfaces contributes to the formation of “rejection islands.” At such points, polyfusion welding does not occur at all or occurs partially.
Pipes with such a defect work for some time, but a burst can occur at any moment. Also common are errors associated with loose fitting of the pipe inside the fitting.
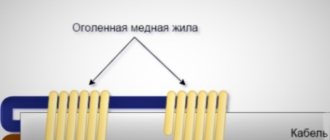
A similar result is shown by connections made with incomplete cleaning of the reinforcing layer. As a rule, a reinforced pipe is installed on high pressure lines. Residual aluminum foil creates a non-contact zone in the soldering area. It is at this point that leaks often occur.
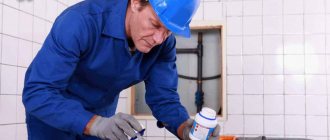
Degrease the parts
According to the instructions of all manufacturers, the parts to be welded must be degreased for a quality connection. And although many craftsmen neglect this and limit themselves to only wiping the pipes with a rag, we recommend sticking to the technology.
YouTube channel "KaUT Company"
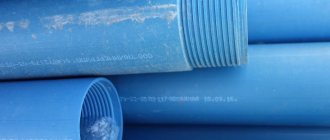
Clean the pipes of any contamination. Drain off any remaining water and wipe thoroughly with a napkin or toilet paper. Clean the surfaces of fittings and pipes with a cloth soaked in isopropyl alcohol.
The same alcohol can easily erase all the inscriptions on the pipes and give them a more aesthetic appearance.
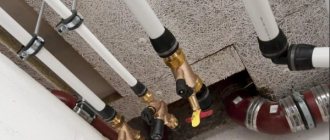
Heat the pipe and fitting
There is a risk of serious burns when working with a hot soldering iron, so be sure to wear protective gloves. Parts of different sizes need to be heated for a certain time. The larger the diameter, the longer.
For a reliable connection, it is important not to overheat the polypropylene, otherwise the material will become fluid, melt and block the fitting from the inside.
YouTube channel “Twice Father Dmitry”
Insert the fitting first into the corresponding soldering iron sleeves, then the pipe. When pushing parts, do not rotate them around their axis or tilt them. Insert the pipe to the previously marked depth until the molten polypropylene reaches the pencil line. Only then count down the allotted time.
All specified data is valid for work at an ambient temperature of about 20 ° C. If the room is colder than 5 °C, the heating time approximately doubles.
Let's get started
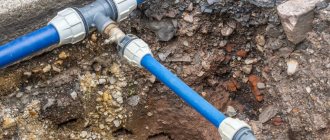
We begin the process of adhesive installation of sewer plastic pipes by preparing the pipes - cutting them to the required sizes and preparing the surface for gluing. To guarantee accurate cutting at right angles to the longitudinal axis, the pipe can be wrapped in a sheet of paper. The edge of the sheet will mark the cutting line. When cutting, do not use excessive force. The smaller the hacksaw teeth, the more precise and cleaner the cutting surface is. The outer edge will need to be filed at an angle of 45, maintaining it along the entire perimeter. Upon completion of processing, it is necessary to remove burrs with fine sandpaper.
You can read about how to replace sewer pipes in an apartment in another article; the basic principles of installing sewer systems are unchanged and do not depend on the connection method. We will move directly to the adhesive connection.
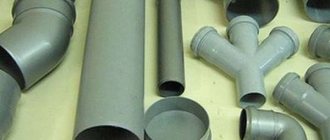
PVC sewer pipes can be bent after careful heating using an industrial hair dryer. However, this operation is quite complex and requires certain skills. The best option is to use ready-made shaped parts: couplings for connecting straight sections of pipes, tees, elbows, bends, crosses, transition couplings between different diameters, etc. As for the gluing process itself, it consists of the following stages:
•The pipe to be joined must be inserted along the entire length of the fitting pipe and an installation mark must be made at the edge. •The surface from the edge of the pipe to the mark must be cleaned with a file. •The mating surface of the coupling or any other shaped product must be treated with sandpaper to give it roughness. •After treatment, clean the surfaces with a rag soaked in solvent. •Apply a layer of glue with a brush along the entire length of the pipe section to be glued, covering the entire cleaned surface. •We carry out the same operation on the inside of the shaped product. Apply the adhesive composition evenly, moving the brush from the inside to the edge. •Connect the pipe with the branch pipe and hold them motionless for 30 seconds. Be sure to read the instructions for the glue. For some brands, it is necessary to slightly rotate the pipe in different directions. •Clean excess glue from the joint surface with a rag.
When using glue, it should be noted that we are talking about a rigid connection that does not have gaps for temperature compensation. The pipe may become hot in the summer, when the ambient temperature rises, or when hot water is drained. Thus, a 4-meter pipe when heated to 20C lengthens by 13 mm. To avoid deformations, it is necessary to install special expansion couplings every 2 meters of the pipeline.
Weld the joint
Without turning or tilting, quickly remove first the pipe and then the fitting from the nozzles and connect both parts in the desired position relative to each other. Don't fuss, but don't hesitate either - you have 4-6 seconds left.
YouTube channel FV Miano
Hold the pipe and fitting motionless for about 5 seconds to ensure the joint locks into place. At this moment, it is allowed to rotate the connection no more than 10 degrees to correct its position.
The complete cooling time, after which the welding site can be loaded, ranges from 2 to 4 minutes.
Remains of polypropylene from the nozzle can be easily removed with a paper napkin while the soldering iron is hot. If you clean already cooled cartridges, there is a risk of damaging the Teflon coating.
Optimal equipment
By and large, the welding procedure does not require the purchase of specialized instruments or several dozen partners. What is needed to carry out the work:
- cutting scissors - make sure that this tool is sharpened properly, then you will avoid deformation of the parts;
- soldering iron with several nozzles - here the soldering iron must correspond to the diameter of the workpiece.
When you get down to work, take your time; balanced decisions and actions are important here. Simple and clear, well-executed soldering technology will give you up to 15 years of trouble-free operation.
Check your connection
YouTube channel FV Miano
You can determine the quality of welding by a small, uniform bead at the end of the fitting. If it is not there, then perhaps the joint is underheated and the tightness will be in question. If the influx is too large, the pipe is most likely overheated and it melts inside, partially or completely blocking the flow area.
For those who are dealing with polypropylene welding for the first time, it would be a good idea to first practice and weld a few practice joints. It's better to learn on straight couplings. Unlike corners and other fittings of complex shapes, they can be easily inspected after soldering, not only from the outside, but also from the inside.