Making a variety of products from profile pipes with your own hands has recently become increasingly popular. The most common structures based on similar elements are greenhouses, gazebos, indoor summer showers, fences, gates, frames of canopies, arches, garages and others. Forged metal parts are especially interesting. Before starting work, calculations are performed and drawings are drawn up with all the necessary dimensions of the future metal structure.
Profile pipes are a universal material from which you can create not only outdoor structures, but also stylish interior items
Installation of a greenhouse from corrugated pipes
Greenhouses are an integral part of any garden plot. Making a reliable frame from profile pipes is the best option for such buildings. Typically, steel elements are used for this. Their strength is ensured by four stiffening ribs. To assemble frame parts from pipes without a protective coating, welding is usually used. Galvanized elements can be connected with bolts.
Note! Structures are most often installed on a strip-type foundation. A more economical option is a columnar base.
Using the drawing, markings are carried out on a previously prepared area (cleared of debris, with a fertile layer of soil 30 cm thick removed). Next, a trench is dug, the depth of which is 70-80 cm, the bottom is leveled, filled with sand, crushed stone, and compaction is carried out. At the next stage, the frame structure is assembled from reinforcement with a cross-section from 8 to 12 millimeters, depending on the scale of the building.
The formwork is installed, the panels are made from boards, moisture-resistant plywood or durable plastic panels. The geometry is checked, fastening with bevels and screeding with bars along the top is performed. Then the base is poured with concrete, the mortgages are inserted, to which the welded frame of profile pipes will be attached. The drawing must be kept at hand until the work is completed, and be sure to consult it.
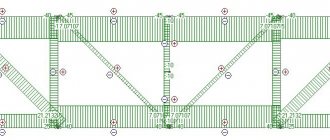
Drawing up a project and cost estimate
At the design stage, it is necessary to calculate all the nuances of the future construction
Before starting construction, it is necessary to prepare a drawing of the garage. It will allow you to more accurately calculate and purchase the required amount of material and make it possible to correctly carry out important stages of work.
The project should indicate not only its dimensions, but also options for connecting parts of the frame, as well as the method of attaching it to the foundation. Any connection points must be calculated as accurately as possible, as well as the location of the stiffeners.
A traditional and very reliable way to connect profile pipes is electric welding. It is able to provide a high-quality connection of all elements that will last for many years. If you want to make a collapsible garage from a profile pipe, which can subsequently be installed in another location, then its frame must be connected to threaded fasteners, and all installation points for bolts and studs must be indicated in the finished project. In addition, collapsible connections will make it possible, if necessary, to increase the dimensions of the garage.
Options for connecting frame parts and the method of attachment to the foundation should definitely be taken into account in the garage project
When designing a building, it is necessary to take into account the characteristics of the material. It is advisable to pay attention to:
- The length of the garage.
It is necessary to choose a garage size that will require a minimum of connections. - Assembly method.
You may have a detachable, welded or modular garage.
A welded frame will save you a lot of time and money, but you will need to find a welding machine and know how to use it.
When choosing a modular design, you can build a garage anywhere
The modular design can be easily installed even in an open field. In this case, you will receive several additional benefits:
- Such a building is easy to assemble even for one person.
- It is possible to disassemble the structure and install it in another place.
- If necessary, you can increase the size of the garage by adding additional modules.
A garage assembled using threaded joints has most of the advantages of a modular design.
Drawings and dimensions of greenhouses
At the initial stage of creating a structure, it is necessary to prepare a drawing of a greenhouse from profile pipes with dimensions and calculate the necessary parts. For the frame, it is rational to take products with ribs 40x40 or 40x20 millimeters, with a wall thickness of 2 mm; for horizontal screeds - 20x20 mm and a wall of 1-1.5 mm.
A frame made of corrugated pipes for a greenhouse is a guarantee of its reliability and strength
Greenhouses come in the following types:
- free-standing arched structures;
- attached to a house with an asymmetrical oval or pitched roof;
- house with a gable roof.
The type of building should also be reflected in the drawing of a greenhouse made of profile pipes. Considering that the standardized length of products is 6.05 meters, it is advisable to use the following dimensions of the metal structure: 3; 4; 6; 12 by 2; 3; 4 and 6 m. The most common dimensions of an arched greenhouse for private construction are 3x6 meters, height – 1.9-2.4 m.
If a gable roof is used, then the height calculation takes into account its slope (usually 30-45 degrees), as well as wind and snow loads for different regions. The most convenient height of the wall is 1.7-2 m to the lower border of the rafters, and the total height of the greenhouse is accordingly about 2.6 m. It is important to understand that the roof slope should be 10-30 cm longer than the metal structure. This should be taken into account when cutting corrugated pipes for the rafter system of greenhouses.
Advantages and disadvantages of houses with a metal frame
A frame house has many advantages:
- Short construction period. The average house on a corrugated pipe frame is built in just two months.
- To build a house, a team of four people is enough, which is economically beneficial for the customer.
- The cost of construction is lower than using traditional technologies, with the exception of the construction of wooden frame houses.
- You don't need a strong foundation. The design is lightweight, so you can save on the construction of the base.
- For the same reason, building on a frame does not shrink as strongly as monolithic and brick buildings.
- A metal frame is stronger and more durable than a wooden one.
The disadvantages and difficulties in the construction of metal frame buildings include the following:
- The frame made of corrugated pipe must be professionally and competently calculated. It is important to correctly calculate the loads on load-bearing and other beams and columns, which is impossible to do without special knowledge. Therefore, it is necessary to involve experienced specialists in the design of residential buildings with significant building area.
- Hence the difficulties in determining the optimal cross-section of pipes and material thickness, and the economic justification of the costs of purchasing metal structural elements. When buying pipes with an excessive safety margin, the consumer pays extra money. Saving money by purchasing pipes with a smaller cross-section and wall thickness than required will lead to irreparable errors in the construction of the entire building.
Welding of greenhouse metal structures
Taking the drawings as a basis, all elements of the future structure are cut to size. Two layers of roofing material are laid on the tape (base), and pipe piping is made around the perimeter. Welding is used to attach them to the mortgages. By bending, the products take the form of arches, are installed perpendicular to the base and attached to the harness.
Note! The recommended distance between arches made of pipes (profile) is from 90 to 100 cm.
First of all, you need to prepare the arches for the future greenhouse; to do this, you need to bend the pipes using a machine or pipe bender
If the calculation of loads requires strengthening the structure, then transverse beams are used. The lathing is laid across the arched elements and serves as the base for the covering material.
To maintain the integrity of the greenhouse, after installing the structure you need:
- thorough cleaning with a stiff brush;
- processing with abrasive sandpaper;
- solvent washing;
- primer;
- painting.
For ventilation it is necessary to make vents. They should also be included in the greenhouse plans. It is better to enter it from the end with a door height of 1.9-2.1 meters and a width of 70-80 cm. A winter version of a greenhouse structure made of profile pipes may include a small vestibule to prevent cold air from entering inside.
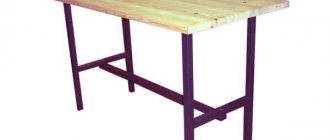
How to easily make a bench from corrugated pipe with a back
The presence of a back does not complicate the design too much. You just need to increase the number of elements and arrange them correctly.
The proposed design uses rectangular sides, the lower parts of which protrude back - for greater stability and so that the bench cannot tip over. The back has three longitudinal elements and three transverse ones, the seat has only two longitudinal beams. The third is located lower, between the sidewalls, to increase the strength of the structure. You can move it to the level of the lower crossbars of the side frames, but in this case it is better to install two such beams - in front and behind.
The bench is made from a square profile pipe 30x30 mm by welding. For the flooring of the seat and backrest, dry pine boards, section 20x100 mm, are used. The length can be strictly equal to the length of the bench (1500 mm); it can be increased due to side extensions by 20...100 mm on each side.
Calculation of materials:
- profile pipe – 2 pcs. 364 mm, 5 pcs. 350 mm, 4 pcs. 500 mm, 1 pc. 140 mm, 8 pcs. 1500 mm;
- board 20x100x1700 mm 5 or 6 pieces (on the back, if desired, you can install not two, but three planks).
To weld a metal bench, you must adhere to the following sequence:
- First, the sides and back are made;
- then the sidewalls are connected with the longitudinal beams of the seat and an additional beam located under the seat;
- weld the shortened stand onto the beam under the seat and attach the middle cross member of the seat;
- connect the bottom of the bench to the back.
After completing the welding work, the seams are cleaned, polished if necessary, and the frame is painted.
In the finished frame, holes are marked and drilled for the seat and back boards, and wooden elements are fastened. It is better if the tree is treated with an appropriate decorative and protective compound before installation.
The process of preparing parts (including wooden ones) and assembly is shown in more detail in the video.
The profile benches shown in the diagrams below are assembled using a similar principle.
Here, instead of transverse strips of the sidewalls, bent elements are used.
In this version, the sidewalls are completely assembled from parts bent according to a template, and the frame of the back and seat is made of strip.
Simplified design without side members and longitudinal beams. It is advisable to use a larger cross-section pipe and pay special attention to the quality of welding.
Model with a wide lower cross member-sidewall support (left) and X-shaped sidewalls (right).
And here is a more detailed drawing of a bench for a summer house with bent armrests, which are part of the sidewall design.
Summer shower made of profile pipes
To build a summer shower from a profile pipe with your own hands, you need:
- prepare a tank with a suitable volume (optimally 200-300 liters);
- perform calculations for the frame from a profile pipe and assemble it;
- cover the frame with sheet material.
A summer indoor shower is assembled from pipes with a cross-section of 50x50 or 40x40 mm or rectangular versions of these products. Welding is used for assembly. Polycarbonate, plexiglass, etc. are suitable as cladding. Columns made of profile pipes are concreted with cement.
As with any construction of this type, the first step is to prepare a calculation and design drawing. A summer indoor shower most often has the following dimensions: height from 2 to 2.5 m, width and length - one and a half meters.
The main stages of construction include:
- preparing the drainage pit and base;
- frame welding;
- shower arrangement;
- Finishing work.
For a summer shower you will need small cross-section pipes and any covering material
The simplest summer indoor shower does not require any special finishing. It is enough to secure the selected sheet material to the frame using self-tapping screws. The door to the shower can be welded from the profile. The most difficult procedure is the installation of awnings. To do this, it is necessary to carry out very accurate calculations and markings. Often a curtain is used as a door to an outdoor shower.
DIY installation of profile structures
In a unified form, the assembly instructions can be presented as follows:
- Development of a product drawing, where dimensions, bend angles, fastening methods, pipe sizes, etc. will be specified in detail. As for the dimensions, they are determined based on the main purpose of the structure. For massive structures (gates, house frames or outbuildings), it is better to take pipes with dimensions of 100x50, 80x80 or 80x60 mm. Products with a cross section of 50x50 or 40x60 are ideally suited for the construction of display cases, shelving, and scaffolding. For furniture items, thin-walled profile pipes measuring 40x25 or 20x20 mm will be sufficient.
- Applying markings, cutting pipes and preparing individual structural elements. It is more convenient to cut a thick-walled dimensional pipe with a grinder, while for small products it is better to prefer an electric jigsaw or a hacksaw.
- Cleaning the cut areas is done with a flat file or with the same grinder with a metal disc or emery wheel.
- Connection of elements. It can be done by welding (it will save time, but will lose in aesthetics) or by bolting. In the latter case, you will need to drill a large number of holes using an electric drill. With profile pipes, unlike round pipes, due to the flat cross-sectional configuration, the area of contacting adjacent elements is sufficient to ensure a reliable connection.
- Installation of fittings (hinges, bolts, latches, handles, etc.), as well as covering surfaces with suitable materials. It can be polycarbonate, metal, solid wood or plastic.
- Final cleaning and painting of the finished product. This stage of work will help protect the joints from corrosion, and give the structure itself an attractive appearance.
We recommend that you read: Which pipe is suitable for installing a heated floor and how to calculate the number of pipes
Features of metal profile bending
Many products (especially pieces of furniture) that you can make yourself from a profile pipe will look stylish and elegant with rounded elements. This inevitably brings the home craftsman to the issue of bending pipes.
It will most likely not be possible to do this manually; the bend will almost certainly be uneven, or even lead to a break in the pipe. There are several ways to correctly bend a profile pipe:
- Order the necessary operations to be performed at a factory that has the necessary professional equipment. Not the most convenient method, requiring delivery and removal of products from the factory, which may not always be found nearby.
- Buy your own pipe bender. The device is easy to find on sale in large construction stores, but it is quite expensive, so the purchase will be justified only for constant large volumes of work. The most suitable option for those craftsmen who have turned the production of structures from profile pipes into a permanent business.
- Use an angle grinder and a welding machine. Not the most aesthetic method, which involves making several (the number will depend on the required bending radius) slits, bending the pipe and welding the seams.
- Bend the metal profile using sand. A wooden plug is tightly driven into one end of the pipe, after which the product is filled with sand and closed in the same way from the second edge. After these manipulations, the bend turns out smooth and aesthetic, and the sand, after giving the desired configuration, is simply poured out. In the cold season, sand can be replaced with water frozen in the cold.
Summer indoor shower: the creation process
When the calculations and drawings are ready, you can begin directly assembling the metal structure from profile pipes and forming the base.
Note! When preparing a drainage pit, the bottom of the pit must be filled with sand and gravel, and its walls are lined with brick or stone.
An outdoor shower involves creating a base with a drain. For this:
- the site is being prepared;
- a drain pipe is laid at an angle into the hole;
- Marking of the site and formwork along its contour are carried out;
- the bottom of the formwork is covered with a layer of crushed stone and compacted;
- supports (pillars) are installed in the corners of the formwork;
- a metal reinforcing mesh is laid;
- The formwork is filled with concrete.
In order to install a pole, it is necessary to drive the pipe 20-30 cm into the ground. Such a stand can be positioned either vertically or at some angle. The reinforcing mesh must be laid so that it rises slightly above the crushed stone.
The summer indoor shower has a tank, so the manufacture of the frame must begin with assembling the frame for it. To do this, the racks are connected along the perimeter and diagonally, and then with crossbars located on three sides. Such a frame will have good rigidity.
It is better to make the base for the shower from concrete, then the whole structure will be almost eternal
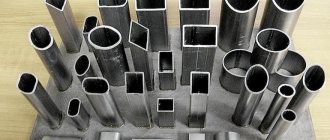
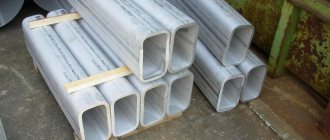
Profile pipe and its application
Currently, profile pipes are widely used and used in various fields of industry, production, and construction. This type of rolled metal became popular and recognized relatively recently, but even in such a short period of time it became necessary and valuable; and now there is practically not a single building in which a profile pipe is not used. The main characteristics of this type of product are excellent load resistance and high technical qualities. Thanks to this, the range of use of profile pipes is very wide: sports facilities, modern buildings and fences, shopping centers, etc.
Pipe production
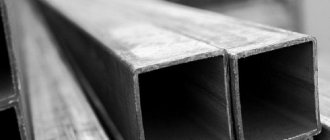
Profile pipes with a cross-section other than round (square, rectangular, oval) are produced from carbon or low-alloy steel (less often stainless) on pipe welding machines. They are produced using a process of deforming a round billet either hot or cold. The wall thickness of this type of product varies: from 1 to 22 mm, the length also varies, and this suggests their use for many purposes. All pipes undergo non-destructive testing of the weld in accordance with GOST and are heat treated to impart strength.
Advantages of using a profile pipe
The high strength, rigidity and reliability of profile pipes allow them to be used in any industry. Representing a hollow beam, these pipes are more economical both in terms of price and in terms of using less metal for their production than a full-fledged metal beam. The manufacture of complex engineering structures also involves the use of profile pipes. Repair work in apartments, residential buildings, production of fencing, fences, frames, railings, supports; use in the production of furniture, agricultural machinery, the automotive industry, commercial equipment, billboards - these are not all the areas of use of this type of product.
Where are profile pipes used?
Recently, many people who like to make various products for their home and household with their own hands have gained more opportunities due to the fact that there is a wide range of profile pipes on the markets. This type of product is versatile enough to be customized to your liking. In appearance, products made from such pipes are similar to forged ones. Excellent decorative gazebos for summer cottages, frames for greenhouses, greenhouses, canopies, benches, bases for flights of stairs, fences, gates and much more can be made from profile pipes. This is an economical, reliable, durable material.
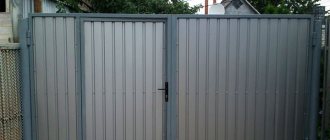
Profile pipe for fence, gazebo, greenhouse
For vertical fence posts, it is better to choose steel pipes with a section size of 60x60 mm, and for horizontal ligation, gate frames and wickets, profile pipes of 40x20 mm and 40x40 mm, respectively, are suitable. Your dacha plot will be more landscaped if you decide to make a gazebo. A pipe with a wall thickness of at least 2.5 mm is suitable for this. Its size is usually 80x80 mm. A frame for a gazebo made of a profile pipe will be stable, strong, reliable, and you can cover the roof with metal, polycarbonate or anything else of your choice. The greenhouse frame made of a 40x20 mm profile will last a long time and will withstand significant loads, as well as temperature changes.
Lightness, compactness, long service life, ease of assembly - all these are advantages of products made from profile pipes over metal or wooden counterparts. Reliable and beautiful things for your home made from profile pipes will delight you with functionality and aesthetics.
Pole made of corrugated pipe: where to use and how to install
The post is an important component of any fence. It performs a load-bearing function and is a support for horizontally located elements (logs). Fence posts come in different types, and the durability and reliability of the fence depends on its correct choice and quality installation.
Among the materials for the construction of fences there are brick, wood, concrete, however, metal is considered the most acceptable for these purposes. Forged elements made from profile pipes are also in particular demand. The metal pole has good rigidity, can withstand significant loads, is practical and has a presentable appearance.
Such products from a profile pipe can have a square or rectangular shape. The latter is used more often. A post made of corrugated pipe is suitable for organizing a fence made of corrugated sheets, chain-link mesh, Euro picket fence and wooden picket fence.
The choice of installation option for metal elements depends on the type of soil and the general condition of the soil. The most accessible methods by which a pole can be installed include driving into the ground, backfilling and concreting. Often the fence is decorated with forged parts.
Properties of profile pipe as a material
Sectional diagram of a profile pipe
Any metal pipes are divided according to several parameters, the most significant of which is the cross section. Pipes in cross-section come in only two varieties - round and with a certain profile, and some characteristics of the material directly depend on this.
For example, a profile section (most often in a rectangular shape) is much more resistant to fracture compared to a round pipe. This is especially noticeable when bending loads are applied - but at the same time, they weigh noticeably less (by 20-25%). An additional advantage is that, due to their shape, corrugated pipes are more convenient to use, especially when connecting elements with bolts.
Characteristics
Regulates the characteristics of the profile pipe GOST 13663-86. He says that this material is divided into 3 types:
- Cold-deformed pipes.
In other words, cold drawn pipes. - Hot-deformed pipes
. Manufactured under high temperature. - Electric welded pipes.
They are produced using welded technologies.
Hot and cold rolled pipes do not have seams, so they are more reliable and are used not only in the manufacture of metal structures, but also in the installation of pipelines.
Dimensions
Geometric dimensions affect the cost of the material; they are regulated by GOSTs, which include, in addition to the height, width and cross-section of the profile, the dimensions of the walls and the length of the material. Although the dimensions are determined by GOST, the production of non-standard material with its own dimensions is not prohibited .
Size chart for rectangular profile pipes
The cross-section of the profile pipe can vary within 10-180 mm with a thickness of 1-14 mm. The standard length of products depends on the production method and can vary between 1.5-12.5 mm. In addition, any professional pipe is regulated by the composition of the metal.
Size chart for square profile pipes
Wall thickness
This characteristic determines the reliability and durability of the material, weight and area of its use. Determined by GOST taking into account the type of pipes:
- For cold-worked – 1-8 mm;
- For hot-deformed – 4-14 mm;
- For electric welding – 1-5 mm.
The weight of the pipe is affected by the thickness of its walls. Knowing the specific gravity of products and external dimensions makes it possible to calculate the wall thickness in hard-to-reach places.
Features of forging from a profile pipe
In general, forging is a process of processing metal blanks in which they are given a certain shape and size. There are cold and hot technologies.
Cold forging technology involves processing pipes using a special machine
Hot forging involves heating the workpiece to a certain temperature, depending on the type of metal, at which the latter loses strength and becomes ductile. A high degree of ductility is the main advantage of this processing. Thanks to this, forged elements can take on a wide variety of shapes. However, heating metal also has disadvantages that can affect how you organize the process yourself:
- the need to equip a forge, fuel costs;
- increased fire danger.
In addition, hot forging requires knowledge of the specific temperature conditions of metal processing. Cold forging involves giving the required shape to a workpiece by bending, pressing, and welding. It is a little simpler to implement and does not require a lot of space.
Note! Such forging is performed with certain workpieces without the possibility of correcting errors.
Today you can find forged gratings, fences, fences, stairs, railings, balconies, canopies, etc.
Materials and tools for work
Having prepared a detailed diagram of the future garage, it is easy to calculate exactly how many pipes, cladding material, connecting elements, etc. will be required.
Once the design is complete, you can purchase the necessary materials. It is impossible to give specific recommendations on the choice of material. For example, you need to choose the cross-section of profile pipes for making a garage frame taking into account the overall dimensions of the structure. You can use square or rectangular profile pipes.
Profile pipes with a cross section of 10x10 cm are the most popular option
It is convenient to use material with a cross-section of 10x10 cm - such pipes can withstand almost any weight of garage cladding: both corrugated sheets and heavier material. The remaining parts of the frame (roof elements, stiffeners, etc.) can be made from a pipe with a cross-section of 6x6 cm.
To build a garage you need to prepare:
- Profiled pipes of the required section;
- Profiled sheeting;
- If welded connections are planned - a welding machine;
- Fastening elements;
- Set of wrenches;
- Screwdriver or electric drill;
- Angle grinder with discs for cutting metal;
- Marker for marking.
When erecting a roof, it is recommended to choose profiled sheets
It is convenient to use profiled sheets for cladding the building; it is not recommended to use clapboard and plywood. These materials will have to be additionally protected from moisture and painted.
It will not be possible to complete the job without such essential tools as:
- 10-meter tape measure, since you will have to measure a long profiled pipe;
- Electric drill with a set of metal drills;
- Bulgarian;
- Marker.
Don't forget the tools and materials you will need to prepare the foundation:
- Crushed stone and sand;
- Facing material;
- Plumb;
- Building level;
- Scrap;
- Bayonet shovel.
Important! Always use protective gloves and goggles when working with metal. You shouldn't risk your health.
Other products from corrugated pipes (forged and not only)
Forged elements are found everywhere and are distinguished by their individuality. They can be used for benches, gates, showcases, tables, etc. Some forged products are good as parts of decor.
You can create a lot of useful things for your home and garden from square or rectangular steel pipes
Arches made from profile pipes may be required for the construction of gazebos, canopies, garages, decorative bridges, fence sections, and temporary buildings. Their use can significantly reduce the time spent on installation of structures. Thanks to arches made of profile pipes, snow and wind loads are reduced. The profiles can be used to create beds, trade and exhibition equipment, racks, shelves, office furniture, billboards, veranda and terrace frames, and stairs.
Another option for using products is a do-it-yourself house frame made from a profile pipe. It is suitable for buildings with light loads. Particular attention must be paid to wind influences. The disadvantage of a house frame made of profile pipes is its high thermal conductivity and, as a consequence, the need to use a thermal profile. Gates and wickets made of profile pipes have become widespread. It is reliable, easy to install, and the cost of the material is affordable.
Do-it-yourself metal structures made from profile pipes have many advantages. Similar elements (both forged and not) are used in many areas of life. If you correctly calculate the building, it will be durable and reliable.
What needs to be done next?
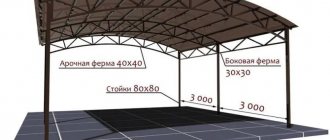
From a 40 by 25 profile, you make the top trim with your own hands. The trusses belonging to the six-meter canopy are then installed on it.
Depending on how often precipitation falls in the region, you need to choose a pipe, not only for arches, but also for forms located in the transverse plane.
30 by 30 millimeters - this section is quite enough to create yard sheds with a small area.
Roofing material is of great importance. Translucent and lightweight cellular polycarbonate is an excellent option for arranging curved arched roofs.
Fireproof metal profile sheets are best used for erecting a direct canopy, single or double slope, in the barbecue area. The structure must be thicker if it is covered with heavy materials.
The light and curved shapes of the frame look attractive. There are special roller pipe benders that allow you to set a certain pipe bend with your own hands.
Video
DIY canopy part 1
This device allows you to assemble the canopy frame with your own hands much faster using prof. pipe.
Watch the video
Let's move on to installing the canopy ourselves
This stage always begins not only with the installation of support columns, but also with markings. It is recommended to adhere to a step of 2 - 3 meters when installing parts.
The cross-section of the pipes will have to be increased if the spans themselves are larger. Because of this, the work becomes more expensive.
A garden drill with a diameter of up to 30 centimeters will allow you to easily create holes, which also need to be made to install the frame (drawings of the canopy frame are presented below in the article).
A depth of 60 centimeters will be sufficient. It is necessary to compact the bottom of the holes properly when all the holes are ready. Otherwise, the columns shrink.
The gravel or sand base, up to 50 mm thick, is compacted and backfilled before installation begins.
Next, they install the column itself, and then fill it up using concrete. For more accurate installation, you need to use a plumb line or a building level.
You can do the job alone, but there is a high chance of making mistakes. Therefore, it is better to attract help. Once the concrete has set, there will be no room for correction.
Concrete is poured to the level at which the pit itself begins. For floors, you can make a concrete screed, or cover the surface with paving slabs.
Video
Do-it-yourself gates and canopy. We make trusses for hanging gates and canopies.
What other stages are included in the work?
Creating a small pit is mandatory, regardless of the materials used. To do this, you need to remove the soil to a depth of 100-150 mm.
After this, the surface can be easily compacted and leveled. It is better to cover the surface with geotextiles if special paving slabs are being laid. Then the grass will not break through. You can also make a concrete screed, which is essentially the best option.
Gravel or sand are equally suitable for making the sole. Backfill is made at a level of 50 mm. After this, the material is also compacted.
Creating an optimal drainage system is impossible if this layer is missing. It is always needed for such a product as a do-it-yourself canopy made from a profile pipe, the videos confirm this.
After this, they proceed to laying the reinforcement cage. It is also necessary to pour a layer of concrete at least 50 mm thick. This structure can easily withstand a load of up to 3 tons. There are several other important steps.
- We take the upper part of the columns, and it is on it that we make the strapping, around the entire perimeter
- On a beam with a horizontal arrangement, it is necessary to place transverse type trusses for the form in an inclined position.
- It is recommended to install parts in increments of up to 80 centimeters if the roof is single- or gable.
- In general, the pitch is selected depending on the width of the polycarbonate sheets themselves.
- Most often they try to stick to the figure of 400 mm.
Video
DIY polycarbonate canopy