Until recently, galvanized gutters were considered not very popular due to the fact that galvanizing, according to popular belief, does not last long. Yes, and such gutters would not have been called attractive back in Soviet times, and they would hardly fit into the modern design of the house. But during the boom of more diverse plastic drainage systems, foreign companies were actively working on the composition of galvanized ones all this time, and the final quality increased significantly.
Of course, thanks to modern technologies, there is no need to use only galvanized pipes, as before, but it is from this material that you can easily make your own spectacular and non-standard drainage systems, and not just weather vanes and canopies. Therefore, let's figure out why a modern galvanized drain is valuable and how to design, manufacture and install it yourself.
Content
Until relatively recently, almost all drainage systems in Russia were made of metal only, although galvanized drains were rarely used due to their high cost. But modern drainage systems made of such material have the highest resistance to ultraviolet rays, temperature changes and corrosion of all metal ones.
We are talking about steel of a special alloy, which is also durable and resistant to serious mechanical damage. Moreover, you can choose the protective coating in all its diversity as matte. and glossy, and modern galvanized gutters are coated with plastisol, pural or polyester. But until recently, only manufacturers of plastic drainage systems offered at least some color range, but today both steel and aluminum systems have such designer luxury. The only gutter that is still not customary to paint is copper.
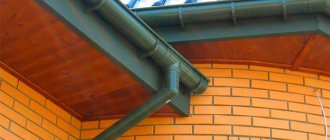
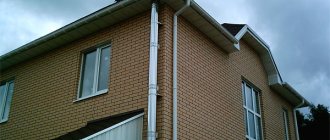
This is what a modern galvanized steel drain looks like:
The only disadvantage that you will still have to face is the frequency of repairs, because... Due to thermal expansion and contraction, the seams in such drains often come apart. Well, then such disadvantages should be compared with plastic cracks, the fragility of ordinary metal gutters and the special attractiveness of copper ones for swindlers.
And keep in mind that galvanized gutters are not suitable for all roofing materials. The fact is that if bitumen was used in the roofing coating, like flexible tiles, then in the heat it melts and sometimes ends up on the pipes themselves. And there the bitumen enters into a chemical reaction with the protective layer of galvanized gutters - polymers. And this causes rust in a short time.
But most of all, galvanized drainage is still valued for the ease of working with it:
Stage I. Making a decision: ready-made or home-made drainage system?
Galvanization is roofing galvanized iron. Its main advantage is that such a drain is the most resistant to corrosion of all metal ones and at the same time is light in weight. It is a pleasure to work with him: cutting, processing, securing. But there is a significant difference in which gutter manufacturer you will install.
Quality and durability
Note that the production of modern galvanized gutters is quite complex and even high-tech. For such systems, only high-quality sheets are used, which ultimately turn out to be much more practical and viable than modern rolled metal or plastic. Therefore, such drains - whether made by hand or industrial - ultimately:
- resistant to corrosion, precipitation and climatic conditions;
- durable due to polymer coating;
- versatile and affordable;
- at the same time they are also light in weight.
The thing is that now such gutters are mostly made of high-quality galvanized steel 0.6 millimeters thick, with a special polymer decorative coating, which is developed using modern technologies. For example, the domestic one offers galvanized gutters with a special protective layer “Plastisol” 100 microns or “Pural” 50 microns. Such products are durable, easy to assemble and come in a variety of design solutions.
By the way, galvanized gutters with a polymer coating are also produced today by Ruukki (Finland), Siba (Sweden), Aquasystem (Germany-Russia), Metal Profile and Lamiera. Such gutters and pipes are coated with zinc and polymer material in the factory. All this allows them to be resistant to mechanical damage, corrosion and fading. At the same time, their color range is quite wide, and you can easily select a system to match the color of your existing roof or facade.
Galvanized gutters from Lindab and Fricke Braas are also known for their quality. In such drains, accidental damage is easily repaired, and leaks are sealed.
If you are not very knowledgeable about brands, or you have a good opportunity to purchase high-quality galvanized gutters from friends, then remember, galvanized gutters have their own quality requirements, thanks to which you can determine how durable the system you are purchasing for your home. So, carefully examine the control sample of pipes: the outer surface of the sheet should be perfectly clean, with a continuous coating - this is very important. There should be no small cracks or sagging of color. Also, such a pipe must have all edges perfectly smooth!
Basic and additional elements
The finished gutter system made of galvanized steel includes all the necessary fastening elements: hooks, clamps, covers, curved elbows, plugs, etc. Their task is to ensure the necessary tightness of water drainage in the right direction. Therefore, you can easily install such a system on a reinforced concrete, brick or wooden wall, of any configuration and in the desired direction.
Moreover, the drain itself made of such material should not be exclusively semicircular. Literally 30 years ago, galvanized gutters with rectangular and more complex profiles, which beautifully imitate a cornice, appeared on the Russian market:
Installation control
When hiring a specialized team, you should monitor the installation process, since it is important to install the material correctly. To do this, you will need to know some of the features of working with galvanization.
The protective layer is resistant to damage and abrasion, and therefore the metal can be bent or subjected to mild impacts without any problems. But it is advisable to use not an ordinary hammer, but a rubberized one. A metal tool will leave damage in the protective layer.
Rubberized hammer for installing galvanized drainage Source gastronomiayviajes.com
The most important thing is to ensure that no scratches appear during installation, which will ultimately cause rust to form.
It is important to know that a grinder is not used for cutting galvanized elements, since the steel will get very hot and the coating will deteriorate. Only use a hacksaw or scissors.
If you notice that the working personnel are violating the instructions described above, then it is worth mentioning this, since damaged galvanization will not provide proper tightness and will soon fail.
Stage II. Designing a future drainage system
The rules are quite simple:
- If the roof area is less than 50 square meters, then you will need 100mm wide gutters and 75mm diameter pipes;
- If the roof is from up to 100 square meters, you need gutters of 125 mm and pipes with a diameter of 87 mm;
- If the roof covers a fairly large building and its total area exceeds 100 square meters, then install 150 mm gutters and 100 mm pipes, or another combination of them - 190 mm gutters and 120 mm pipes, this is also possible.
Now we calculate the funnels for the galvanized drain. One standard funnel can collect rainwater over an area of about 100 square meters. Although much here depends on the size of the drainage system itself. For example, if it is equal to the parameters 150x100, then one funnel will collect water from 150 square meters or from 15 linear meters of gutters. But it’s easier to calculate the number of vertical pipes: just divide the height of the building by the length of the drainpipe you purchased (usually 1-2-3 meters) and multiply by the number of funnels.
Special online calculators on our website will help you calculate the entire system more accurately.
Prices
The indicated prices for gutters from the manufacturer are valid for August 2021. The drainage system will include the following elements (one piece each):
- funnel;
- drain elbow;
- pipe elbows;
- pipe;
- fastening;
Depending on the diameter of galvanized gutters, prices from the manufacturer differ slightly:
| 100 mm | 750 rubles |
| 120 mm | 810 rubles |
| 130 mm | 935 rubles |
| 140 mm | 920 rubles |
| 150 mm | 990 rubles |
| 160 mm | 1060 rubles |
| 180 mm | 1180 rubles |
| 200 mm | 1300 rubles |
| 220 mm | 1500 rubles |
Stage III. We prepare drainage elements
So, now let’s figure it out if you decide to purchase a galvanized sheet and build a drain for your home yourself. Working with galvanization is not difficult, because its protective layer is quite resistant to abrasion and damage, so such parts can be easily bent and even subjected to impacts. The main thing is to avoid deep scratches while working, that’s all.
The easiest way to cut industrial galvanized gutters is with a fine-toothed saw - a hacksaw or a special metal saw. And to make small holes, use special metal scissors. But there is one point here: for galvanized drainage elements you cannot use an angle grinder like a grinder, because... it heats up the steel and destroys the galvanized coating.
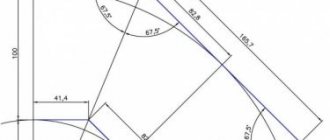
Preparations need to be made in advance - these are templates for all drainage elements. For example, for a funnel it is a ring segment, and for a pipe it is a rectangle. Moreover, you can easily cope with all this on your own, and industrial or home-made machines will only make the process a little easier for you. Today you can purchase quite a variety of bending equipment for this matter, for example, roller benders or a creasing machine, or even rolling beams:
These are the items you will need to make:
Or even limit yourself to this brilliantly simple option, which has the right to life for a small country house or garden building:
And in order to make a high-quality drainage system from this material, you will not need much:
- galvanized iron sheets, about 0.7 mm thick;
- ordinary metal scissors;
- hammer, mallet and pliers.
Make all closed galvanized drainage products with a seam connection. This is a lock that holds the seams together and is quite airtight. The easiest way for you to make a single fold with a simple layout at the edges and with two bends. If you want to make something more complicated, then direct the folds in opposite directions. For drainpipes, a seam with a seam width of 4 to 10 mm is sufficient, so do not complicate the whole process. By the way, almost all galvanized drainage elements are connected using the seam method. Therefore, you can easily make angles and tees of any inclination, angle and configuration.
Here is one of the most popular methods for manufacturing galvanized drainage elements:
- Step 1. Pay close attention to the galvanized sheet itself: it must be smooth, with a uniform surface and processed edges. And, when you start designing your future drainage system, separately outline all the elements you need. After this, place the galvanized sheet on a hard surface and draw a pattern for the future part with a sharp object.
- Step 2. If you are working on making a pipe, then the width of the pattern should be equal to the future diameter of the product plus 12 centimeters on each side for the seam. Also increase the length of the drain by a couple of centimeters. Now use metal scissors to cut out the workpiece, outline the bend of the fold and bend the edges with a mallet. For this, only half a centimeter will be enough.
- Step 3. It will be easy to give your workpiece the shape of a drainpipe: just wrap it around an object of the desired shape, for example, a plastic pipe.
- Step 4. Now cut the gutters and pipes using a hacksaw. All burrs should be thoroughly cleaned with a simple file, otherwise they will interfere with the sealing of the drainage joints.
- Step 5. Simply fold the edges of the strips onto the angle steel, then roll up the sheet and secure the whole thing with a hammer.
- Step 6. Now make an L-shaped fold and hook the edge into the lock. Secure this edge by tapping the edges with a hammer. Just be sure to follow all precautions to avoid injury or cuts from the sharp edges of the sheet metal.
Here is a good example of also simple manufacturing of a galvanized steel drain:
The only difficulty you will encounter is connecting homemade elements to each other. To do this, slightly adjust the short edge of the sheet before rolling it so that it becomes thinner by a couple of millimeters.
Here is another practical instruction for working with this material:
- Step 1. For the pipe, you need to cut a blank from a single sheet, on one side 3.40 meters and the other 3.30 meters.
- Step 2. Now we make seams for the pipe on both sides. To do this, on a metal corner we simply bend the edges of the leaflet 7 mm each with a mallet and bend them in different directions from each other at an angle of 90 degrees.
- Step 3. Turn the workpiece over with the curved corners up and use a mallet to achieve this angle to 130-150 degrees.
- Step 4. As a result, your workpiece should protrude only 1 cm from the corner, and tap it with a mallet along the entire length of the corner. Make such blows that they are strong and confident. Your mallet should lie exactly on the plane of the corner, and at the same time not deviate either to the right or to the left, so as not to damage the seam.
- Step 5. Now we crimp the workpiece around some other pipe and interlock the seams. After this, hit the workpiece with a mallet at the point of adhesion until the corners are completely crossed.
- Step 6. The most ordinary can opener will help you cut your finished pipe into separate elements, oddly enough. Only after cutting, clean the edges.
If you did everything correctly, your parts should fit easily with other elements of the drainage system, even factory-made ones.
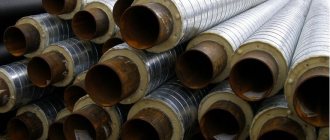
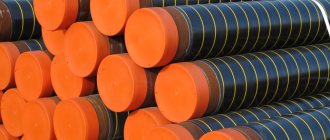
Drainpipes according to GOST 7623-84.
produces high-quality and reliable drainpipes from galvanized steel. We have our own production facilities and a warehouse for finished products. We offer galvanized pipes of standard length and different diameters - from 100 to 220 mm. They fit together easily thanks to their conical shape. If necessary, they are cut into pieces while maintaining their geometry. Drainage pipes can withstand large amounts of seasonal precipitation and ice without deformation. UV and corrosion resistant. Suitable for city buildings and country houses. They do not need frequent replacement or updating of appearance.
Stage IV. Preparing the roof for gutter installation
The entire installation process of a galvanized drainage system includes 7 main stages:
- Step 1. Marking on the walls and roof.
- Step 2. Fastening the outer elements for the gutter.
- Step 3. Restore the level and level the suspension to the desired slope.
- Step 4. Installation connection of gutters.
- Step 5. Connecting the funnels.
- Step 6. Fastening the clamps for the vertical elements of the drains.
- Step 7. Fixing the drainage pipes.
This step-by-step illustration clearly shows the process itself:
In your work you will need the following tools:
Galvanized pipes at Vodostok Center:
- More than 30 years of experience in the market of Moscow and the region.
- The best specialists in drainage systems.
- Fully equipped production facilities.
- Short production and delivery times.
- Providing a guarantee for galvanized gutters.
- Compliance with GOST and SNiP requirements.
- Availability of ready-made gutter elements in stock.
- Regular fulfillment of large volume orders.
- Production of gutters of non-standard sizes.
- Competent calculations and assistance in choosing pipes.
- Competitive prices for all products.
- Providing additional discounts.
Stage V. Installation of fasteners
For a galvanized drain, due to its lightness, the most rational method of fastening to rafter legs is considered. This option is ideal for roofs with a large surface area. Gutters can be installed in this way only before the roofing is laid. Combined brackets with extensions are used here as a fastening element. They are fixed directly to the rafter leg if the rafter pitch is no more than 60 centimeters:
Another option is to install a fastening element on the sheathing if the pitch of the rafters does not exceed 60 cm. This method is especially common if the roof is covered with metal tiles or ondulin.
It’s easier to work with brackets that are attached to the side of the rafters. In fact, the slope of the gutter is created due to the fact that each subsequent bracket is attached slightly lower than the previous one.
The most difficult thing is to screw on the front brackets, because they need to be installed on the wind board. In this case, it is very important to determine the direction of the gutter slope and calculate the difference between the levels of the first and last bracket:
Stage VI. Installation of horizontal drainage elements
Modern galvanized gutters are connected using brackets, latches, locks or rubber gaskets. The easiest installation process is a special snap-on design:
- Step 1. All gutters must be aligned symmetrically in the center so that the joint remains 3-4 millimeters between them.
- Step 2: Now pull the front of the connector towards the gutter and snap the lock into place.
- Step 3. The next step is to lock the lock itself by returning the latch to its original position.
- Step 4. Next, install additional hooks at a distance of 10-15 centimeters from the connection of the gutters.
- Step 5. Now the curl of the gutter needs to be inserted into the curl of the corner to a depth of 2-3 cm, and then sealed.
- Step 6. Secure the connection with two rivets and install an additional gutter connector.
- Step 7. The curl on the plugs must be placed at an angle and turned in the opposite direction. You should feel that the plug is inserted into the gutter all the way. Use special glue to seal and secure. But on the back side of the gutter, the plug needs to be secured with rivets.
- Step 8. Now we mount the funnel. Hook its front edge onto the front edge of the gutter and turn the funnel in its direction so that the retaining plate bends inside the gutter. If desired, insert a “spider” into the funnel at this stage.
- Step 11. At the last stage, we make the transition from the funnel to the drainpipe. To do this you need two universal elbows. Consider water drainage below.
- Step 12. Mount the corner elements of the gutter according to the marks as you did for the funnel and gutter connectors.
- Step 13. Then install plugs at the ends of the gutters so that the distance to the gable roof boards is at least 3 centimeters.
- Step 14. Install the pipes starting from the funnel. If the roof offset is small, then use a coupling or coupling outlet.
- Step 15. Install the pipe bracket and leave 10mm to accommodate thermal expansion - this is a very important point.
Here is a good master class on this topic:
Stage VI. Installation of vertical drainage elements
Drainpipes, where water flows from the gutters, must be secured to the walls of the house using special holders. These consist of a clamp that covers the pipe and a fastening element that is directly mounted into the wall. Most often this is a long nail, a plate with screws, or a special pointed rod.
Holders should be located above each pipe connection. For example, when installing long straight sections, the holders should be fastened in increments of up to 2 meters. Moreover, for walls made of different materials (brick or wood), you need to use your own fastening elements.
Here's the whole process in detail:
Drainpipes, in which water flows from the gutters, must be secured to the walls of the house using holders. Typically, such an element is a screw, a nail, a pointed rod or a plate that is attached with screws. It is important that the holders are located under each socket - this is the junction of the pipes.
When you install long and straight sections of pipes, attach the holders in 1.8 meter increments. Please note that different holders are used for wooden and brick walls. Thus, the kit for a drainage system for brick walls usually includes screws and a plastic dowel, under which holes are pre-drilled to suit its size. Gutters are attached to wooden walls using a plate with screws or a rod. A long rod is simply driven into the wood, but you can’t do without plates when the walls are too thin.
Stage VII. Protects galvanized gutters from scratches and corrosion
The main enemy of galvanized gutters and drains is branches and debris that fall onto the roof with the wind and are washed into the drain by rain. These can scratch even the most resistant polymer coating (and it’s much worse without it at all), and therefore it is better to protect the entire system as much as possible.
The simplest method is gratings, which are produced today in standard parameters: slotted, perforated, stainless steel, plastic, galvanized, brass and cast iron. They need to be secured with a latch or with screws and nuts. It is important that the top surface of the grating remains 25 mm below the surface of the roofing so that rainwater drains well into the gutter.
In turn, the basket will also help to cope with the problem. Water flows through the gutters, and the basket retains the largest contaminants, such as leaves and branches. This basket is easy to remove and clean, which is its advantage. Also, such a modern element of the drainage system as a sand trap is designed for the same thing as a rain inlet, but at the same time retains smaller dirt and sand.
Here's a good example of how to protect a galvanized drain from debris:
Galvanized drainpipes - from the manufacturer.
manufactures drainpipes from galvanized steel 0.5 mm thick.
In production we use only high quality steel. Our own technologies allow us to reduce production time while maintaining excellent product quality. This way we can offer very low prices, which you can see for yourself. We produce drainpipes of various diameters. Standard diameters are always in stock, and we can also produce according to your sizes.
Stage VIII. Final work
Lastly, plugs are installed. They are installed at the end of a row of gutters and equipped with a pipe. The plugs must be connected to the sewer channel and connected to each other by the necessary elements of the system.
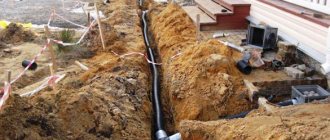
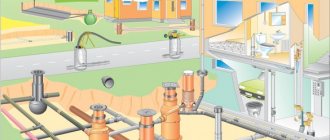
At the end of the channel, install rainwater inlets or drainage wells. After all, if you have a problem with flooding of the site and you want to organize at least some collection of melt and rain water, then connect the drainage system with a linear drainage system.
The problem is that rainwater from the roofs, falling on the ground, drains it and always turns into perched water. Over time, it can not only complicate the operation of the site, but also affect the very condition of the house. It makes the walls damp, floods the basement and washes away the soil from under the foundation. Cracks on walls most often occur when the area is rainy and drainage is not provided. But, if you approach the issue of installing a galvanized drain correctly, no problems will arise!